

When I became a mom in 2003, I took a lot of photos of my kids. I bought a nice camera. I tried to get artistic. In fact, so did every mom I knew. I used to joke that every mom with a camera thinks she’s a photographer. It didn’t take me too long to figure out that having a nice camera did not make me a good photographer. It’s a skill and a talent, that involves both technical know-how and a great eye to do well. I may not be a talented photographer, but I know a thing or two about making photography websites, and I thought I’d share that knowledge so you can make your photography website look as good as your photos.
One thing I notice with photographers is that they tend to be pretty tech savvy, and so they tend to want to make and manage their own websites. Which is great! However, while they may have the technical skill to put together a website, they sometimes don’t have the knowledge and understanding of how their audience is using websites and what appeals to a customer looking to hire a photographer. (Which can be quite different than what a photographer is looking for when they check out photography websites.)
Tip #1: Avoid Slideshows and Carousels
I have a running joke that the best place to hide your photos and content is in a slideshow. Nobody wants to sit and wait while your slideshow slides through your photos. It is a big mistake to use slideshows or carousels on your photography website. Instead, you should be using photo galleries. Check out the differences below. If you wanted to see examples of someone’s photos, which is a better user experience?
Slideshow Example
A slideshow is a dynamic presentation of images that automatically cycle through one after another, typically in a predefined sequence. You see one photo at a time, and usually have dots or arrows to cycle through the images at your own speed.


Carousel Example
An image carousel is a type of user interface component that displays a series of images or content elements in a rotating or sliding fashion, often showing a few photos at at time with the ability to scroll left or right to see more photos.


Gallery Example
A photo gallery on a website is a collection of images organized and displayed in a structured manner for users to view. It provides a visual way to showcase photographs or graphics, often grouped by a common theme, event, category, or subject. A gallery lets the user see and scan all the images and click on ones they want to see larger. Galleries can have multiple columns and be arranged in a number of ways.


In my opinion, the gallery provides the best user-experience to someone who wants to see your photos.
Tip #2: Organize and filter your photos
While there may be overlap between the demographics of people looking to hire photographers, typically if someone needs a wedding photographer, they probably aren’t interested in seeing your baby photos. They want to see photos of weddings. A common mistake I see is when photographers have giant galleries with all their work. This is particularly important if you do a variety of types of photography. If you focus solely on wildlife photography or solely on corporate events, you won’t necessarily need separate pages for your galleries. But if you do both wildlife photography and corporate photography and baby photography, those photo galleries should be on different pages of your website and people should be able to easily navigate to the types of photos they want to see.
Tip #3: Be selective in your photo galleries
Some people say you can’t have too many photos. I disagree. It is easy to overwhelm a user with too many photos. Be selective with your photos. Having 20 excellent photos is often better than having 100 photos in a never ending gallery. It’s overwhelming and exhausting to the end-user.
I recommend no more than 20 or 30 photos in a gallery. You should be able to showcase your talent and skill in that number of photos if you take the time to edit and choose your photos appropriately.
However, I have an exception to this rule. One thing I really like, and can make a big impact, is having multiple galleries for each type of photography you do. For example, say you do wedding photography. Instead of having one wedding gallery, you have several galleries and each gallery would showcase a different wedding. Having a series of photos from one event is more powerful than having twenty photos of twenty different events. It’s important that they be organized in a cohesive and organized manner.
I recommend having a page that shows one photo from each gallery with a little text overview of what’s in that gallery (no more than a sentence or two) that links to a new page with that particular event gallery. This allows you to add more photos to your photography website without overwhelming your user, and it allows you to tell a story with your photos, which has a bigger impact than a collection of unrelated photos.
Here’s an example of how this could look on your website. Clicking through on the button would take you to that event’s gallery. Note that my example is just a visual example, and the buttons do nothing.
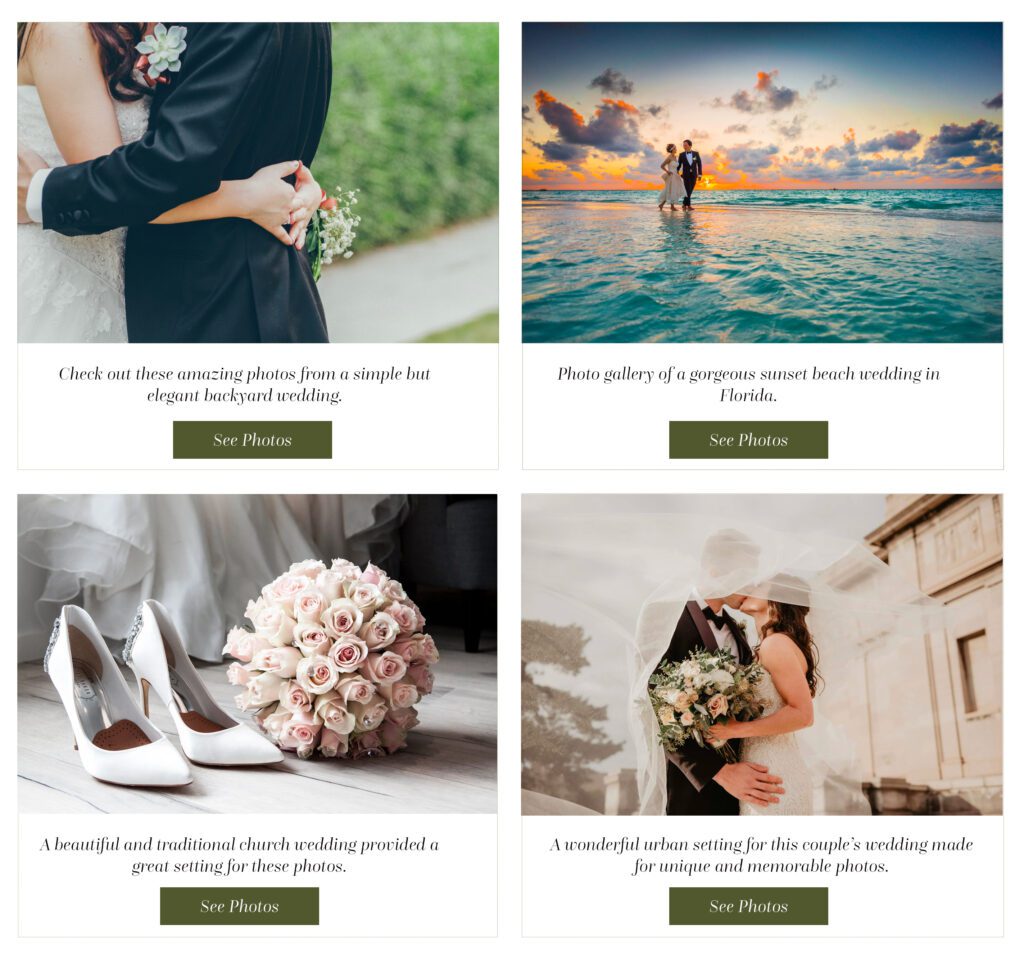
This is especially nice because there could be people who want different styles of photography for the same type of event, and it shows range and tells a story.
Not only that, this can provide a huge SEO opportunity if you use each event page to write up information on that event, including the event location, what the desire of the client was, and how you achieved those goals.
Bonus points if you add dates to show your work is current!
Tip #4: Optimize your photos
There are a couple things I mean when I say optimize your photos. You can optimize for performance, which means to adjust their size, resolution, etc so they perform better on your site. This is absolutely imperative if you want your website to be speedy. And then optimize your photos for SEO. These are both optimizations, but different in their intent.
Optimize for Faster Page Loading
People do not want to wait around for your photos to load. And you are probably taking wonderful, high-resolution photos that make fabulous prints. But those photos are huge, and when you upload them to your website, they will take a long time to load, especially if you have a bunch of them. You absolutely must optimize these photos BEFORE you upload them. Here are a few steps you can take to make sure your galleries don’t drag.
- Resize photos. Photos for the web should be at 72dpi and I typically say they don’t need to be any bigger than 1600 pixels wide. You can use a program like Automator to batch resize your photos.
- File Format. Avoid PNG as the format for your photos. Use JPEG for photography website photos. Bonus points if you implement WebP photos on your website.
- Compression. Compress your photos to reduce size. I use tools like TinyPNG for this task. There’s even a Photoshop plugin for this app.
- Use a CDN. Use Content Delivery Networks (CDN) to serve images from servers located closer to the user, reducing latency.
- Lazy Load. Implement lazy loading for images, which loads images only when they are about to enter the user’s viewport.
- Browser Caching. Set appropriate cache headers to ensure that browsers cache your images. This reduces the need for repeated downloads.
Optimize for SEO
One of my biggest pet peeves is logging into someone’s website and looking in the media library and seeing photos named DSC_0786.JPG. This is the default name, and it requires no work for you to upload them with this name. But say in six months you want to find a specific photo from a specific event in your media library? You won’t be able to search for it by name. Every photo you upload should have a specific name so you can organize and find those photos. You can use that same Automator tool I linked to previously and batch rename all your photos. Say you want to upload twenty photos into a gallery for one specific event, those photos should use the event name and be sequential. Instead of DSC_0786.JPG, DSC_0787.JPG, DSC_0788.JPG you would have downtown-st-louis-wedding-01.jpg, downtown-st-louis-wedding-02.jpg. Not only will this make your photos easier to find if you need to go looking for them in your media library, but they also add to your SEO by giving a location and style of the wedding.
Oh, and don’t forget the Alt Text. Every photo you add should have Alt Text, which is alternative text that would display if an image doesn’t load or would be read by a screen reader for the visually impaired. However, you can also use alt text to enhance your SEO by including information about the style, location, and other relevant information about the photo.
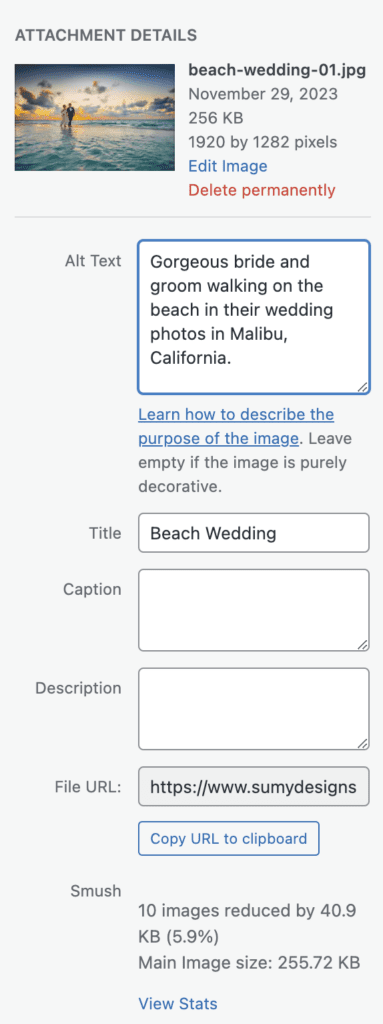
You can include a description of the photo and incorporate your keywords into it for SEO benefits. But don’t just jam in your keywords. Make them appropriate to the photo and be sure the photo description is accurate.
Tip #5: Include Pricing
I’m going to get pushback on this one, because photographers often do not want to include their pricing, but trust me, this is an important part of your website. The myth is that having pricing will scare away your clients, but if the price is too high for someone, then telling them via phone or email will scare them away too and waste your time in the process.
People who land on your website want to know what you charge. If you don’t include pricing, even just ballpark pricing, you are going to spend a lot more time dealing with people who contact you but can’t actually afford you. Photography pricing can really have a wide range. If you tell people what to expect in terms of pricing, you’ll be starting off on the right foot with expectations. It saves times and pre-qualifies your clients.
Tip #6: Add lots of content
You’re a photographer, and a photo speaks a thousand words, right? Sure. It can. But the search engines don’t have eyeballs, so your website still needs words if you want clients to find you. It’s important that all of the pages on your website have a solid amount of content the describes who you are, what services you offer, and why you are the best choice. Photos are important on a photography website, that is unquestionable. But words matter. They matter to search engines and they matter to the person who lands on your site.
Take the time to write excellent content about you, your experience, your skills, and your equipment. Make a great About Me page showcasing you and your team.
Include a services page that outlines the different types of photography you can do, describes your different skillsets, and outlines what you have to offer each individual client.
And if you choose to do event gallery photos like I mentioned above (which I highly recommend!) be sure to include a detailed description of that event along with the photos. The search engines will thank you for it.

Amy Masson
Amy is the co-owner, developer, and website strategist for Sumy Designs. She's been making websites with WordPress since 2006 and is passionate about making sure websites are as functional as they are beautiful.