I tell people all the time they need to resize their images before they upload them to their website, but most people don’t do that. And the reason they don’t do it is usually because they don’t know how. But if you already have a Mac, you don’t need any special software to do this and you can do it fast with an app already on your computer. It’s called Automator.
(My apologies in advance, I don’t have instructions for a PC.)
While we’re at it, let’s talk about renaming those images too. This is another thing that I recommend that often doesn’t get done. And I understand that it does take time to do, but there are a number of reasons why it’s important to rename your images.
- Images that come off your phone or come off your camera are going to be named things like DSC_1001.jpg, etc. If you only have a handful of photos on your site, this might not be terrible. But if you have a site you’ve had for a long time, and later you want to find a specific photo, how likely do you think you’ll be able to find one with a name like that when searching in the media library through hundreds of images?
- There are SEO benefits to renaming your images as well. If you upload 20 photos into your photo gallery for your home listing or contractor’s portfolio, you could name your photos to reflect the content that it goes along with. Instead of DSC_1001.jpg, your images could be named things like kitchen-remodel-atlanta.jpg and guess which one of those two options is better for SEO?
- Renaming your images is going to make it easier to sort, organize, and optimize your galleries, and it’s not that hard to do.
Let’s start with the Automator app. It comes with your Mac, nothing to buy, nothing to add. It does lots of cool stuff, but today we’re going to talk about using it to batch resize and batch rename your images.
If you go to your Applications folder, you’ll find it there. Go ahead and open it up. When you do, you’ll see some options for things you can automate. For this example, we’re going to create a Workflow.

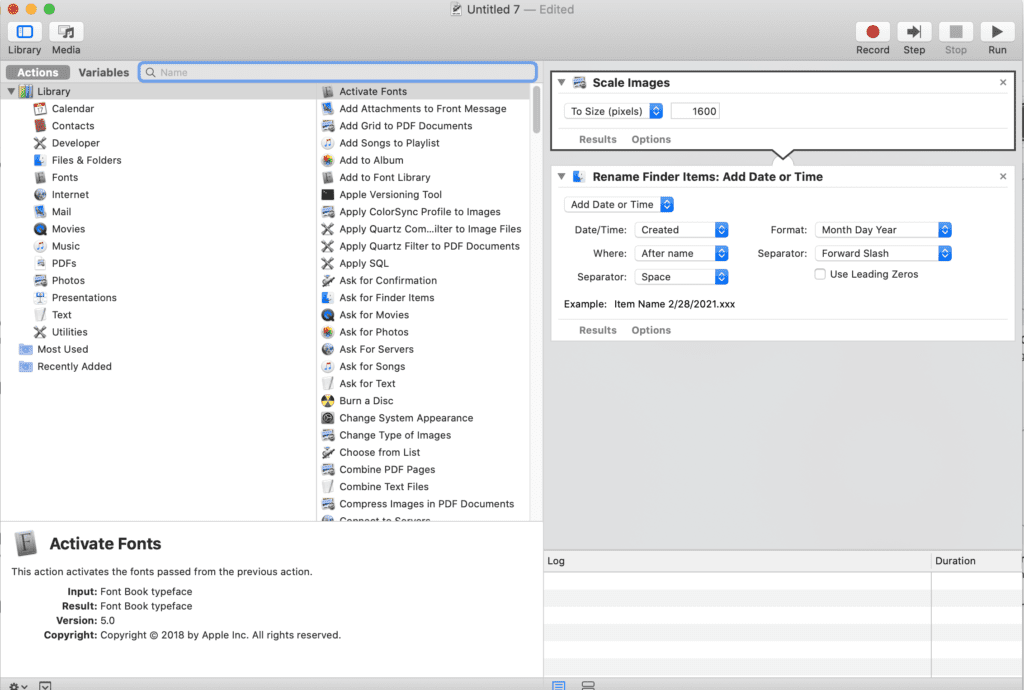
After selecting Workflow, you can pick what types of automations you want to perform. The two you will want are Scale Images and Rename Finder Items. You can either look through the library of options, or search for them by name. Drag and drop both of these items to your workflow area. It doesn’t really matter what order, but I have a tendency to make the renaming the last step in my automation. I can’t say why.

From here, you can make decisions about what exactly you want your automations to do. For example, I want to scale my images, but to what size? I’ve chosen 1600 (and this is in pixels) because that’s about as big as I might need those images to be for anyone, and it’s small enough to significantly reduce file size. This will make each image no wider than 1600 pixels, and they will scale proportionally.
For the renaming, I’m going to make some different choices. Because I’m renaming the images both to be descriptive and for SEO, and I plan to put them into a gallery, I’m going to rename them sequentially.
When you choose to rename your items sequentially, you can use the existing name and add numbers to them, or you can make new names. I’m going to create all new names for these images to describe them. These are kitchen remodeling photos for a kitchen remodel in Cleveland, Ohio. So I’m going to rename these as kitchen-remodel-cleveland-01.jpg etc.

Now that I have my workflow set up, I’m ready to drop my images in. This is as easy as dragging and dropping all your images right into the Automator workflow, above your first action.

Review your automation to make sure it looks like it’s supposed to look. You can see which images you want to resize, what you want to resize them to, and how you want to rename them.
NOTE: This is a permanent change to these images, so it’s a good idea to make a copy of the images before you run your automation just in case you really do need the original size of the image for another purpose later. Maybe you want to get it printed or used in a poster? I like to duplicate all my image folders with the same name but with -optimized tagged onto the folder.
When you are ready, hit the Run button on the top right side.
Within seconds, your images will all be resized to no larger than 1600 pixels and renamed to fit your perfect use.
But wait, there’s more!
If you found this workflow useful, and you think you’ll use it for more images in the future, you can SAVE IT and reuse it whenever you want. Just go to File->Save and you can name your workflow and save it wherever you want… a desktop icon, into your apps folder, in the cloud. Wherever works. Make sure to name it something that you’ll remember like “Batch Resize and Rename.”
Then the next time you need that workflow, you can double-click and open it right up, drop in your images, adjust your settings and hit run.
Automator is a handy little tool that you probably didn’t know you had that can make your life a lot easier! I highly recommend playing around with it to see what else it can do for you!
Amy Masson
Amy is the co-owner, developer, and website strategist for Sumy Designs. She's been making websites with WordPress since 2006 and is passionate about making sure websites are as functional as they are beautiful.
