

If you use Instagram for your business, you already know that you can’t put links in your posts. Well, you can, of course, but they don’t work. They don’t link anywhere. So putting the link in the post is pointless. But if you have an active blog and a lot of followers, then you want to link to your blog posts so your followers can see it.
So the standard has always been to put “link in the bio” on your posts, because that’s where you can add your link. And that works. Sort of. If you have an active blog, then you have to update that link a lot. And if someone sees an older post, then that link is no longer relevant.
Have you ever followed a news network or bigger company on Instagram and clicked on their bio link? Think CNN, Ikea, or even Buzzfeed’s Tasty. Take a minute and open up Instagram and look at some of their bio links and see how they do it. Usually they have a small logo and then a two or three column list of their posts using just images. Probably you’ve seen this on other Instagram businesses you follow too.
Here’s our Instagram landing page
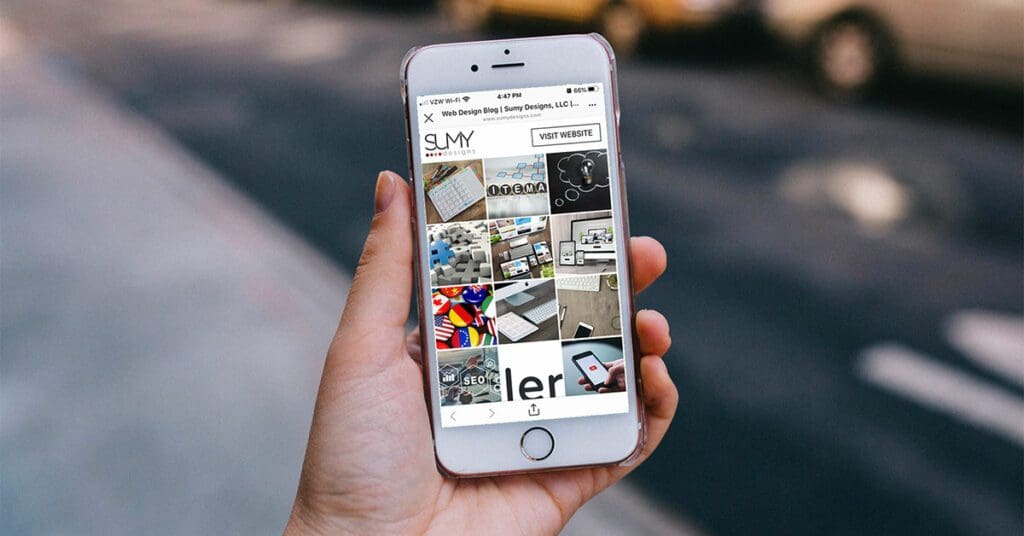
Why do they set up their Instagram landing page this way? Because it can hold a lot of links and is easy to navigate. If I do it like this, then I don’t have to update my link every single time I add a new blog post, because my page easily shows my last 9-12 posts in one simple grid. The images match the image that was shared on Instagram, so the user can easily find the post they were looking for. It’s super easy, looks great, and makes it easy for your Instagram followers to find your posts.
So how do you set up this Instagram landing page?
What would you think if I told you I set up this landing page in less than 30 minutes? Would you believe me? Well, it’s true. And I did it using Beaver Builder and an add-on for Beaver Builder called PowerPack.
If you’ve followed this website long, you know I’m a pretty big fan of Beaver Builder. I build all websites with it. Our website is using it. Doing things like making this Instagram page are super easy with the help of this plugin.
Note, you can do this without PowerPack, it just requires a tiny bit more work and some CSS whereas with PowerPack you don’t need either of those things.
Step 1: Create a new blank page
Start by creating a brand new page on your site that will be your Instagram landing page. Make sure to give it a super easy permalink that you can add to your bio. I made my permalink iblog.

Step 2: Select your template
The default template for any page on your WordPress site usually includes your header, footer, and a sidebar if you use one. However, we don’t want any of that stuff in our Instagram landing page. We just want a clean blank slate. Most themes have a “landing page” template built in, that’s just a blank page. Genesis does. Beaver Builder has a template called “No Header/Footer” and that’s the one I picked. Look in your page attributes and see if you can find a landing page template.
Once you choose that template, go ahead and launch Beaver Builder and you should be presented with a nice, blank white page.
Step 3: Add Content Grid Module
The PowerPack content grid module is pretty much my favorite module and I use it all the time. It has some much flexibility to do so many different kinds of layouts. When I need to layout posts, events, custom post types, etc, this is how I do it.
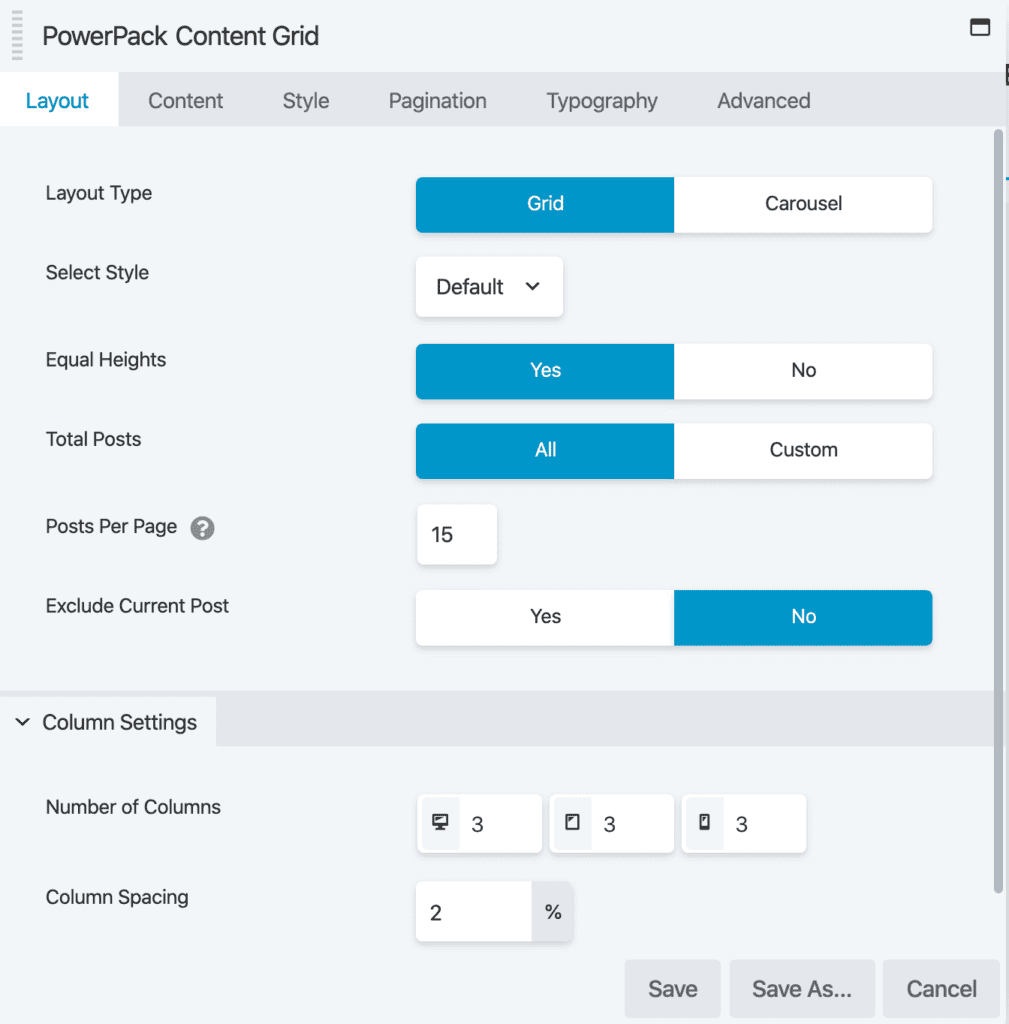
Step 4: Adjust your content grid settings
In the Layout tab in your module settings, you can go with the basic settings already in place, just make a couple of changes. First, change your column settings for tablet and mobile to 3. By default, it has 3 for desktop, 2 for tablet, and 1 for mobile but in our case, we always want three columns. Depending on how much spacing you want between the items in your grid, you change the column spacing. I changed mine to 1 to make it pretty minimal.
Change the total number of posts to 15 or 18. This will give you 15 or 18 posts showing on the page. Set Equal Heights to Yes.
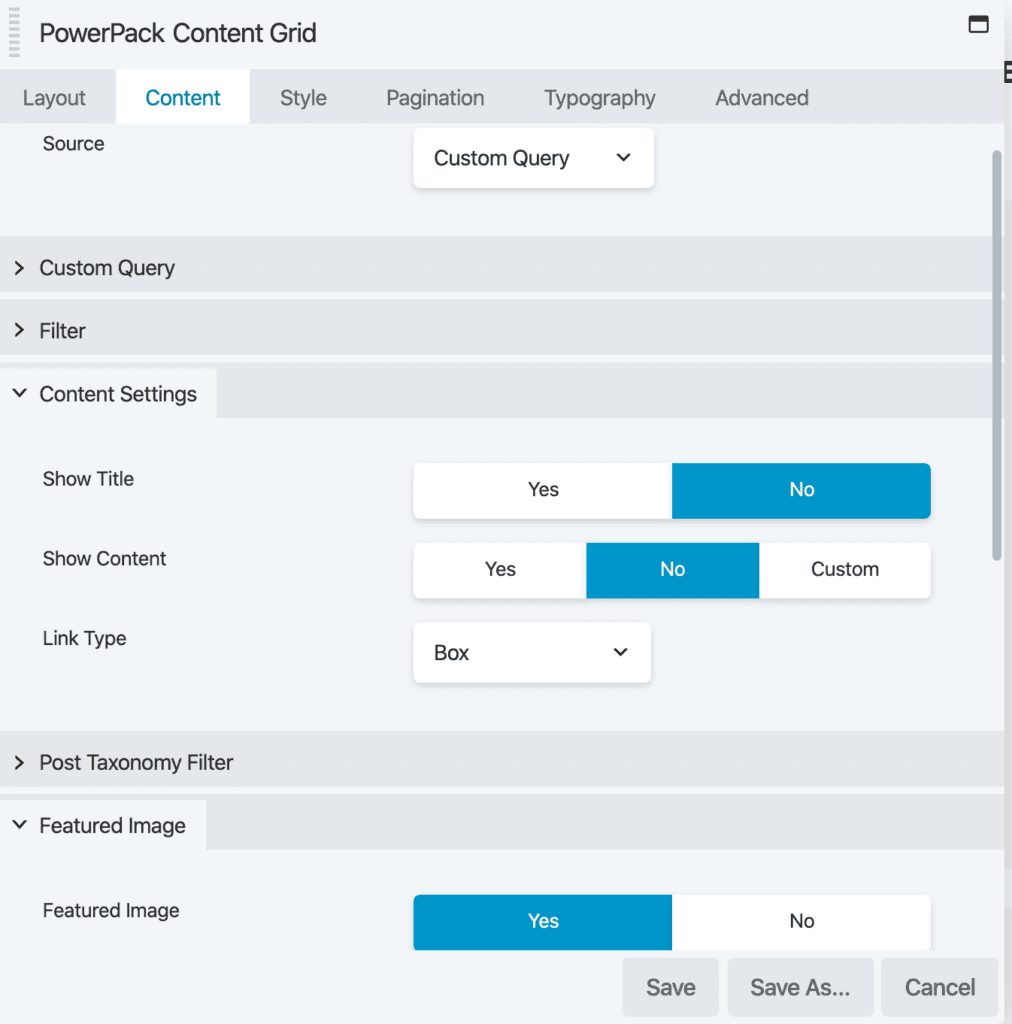
On the Content tab, skip down to the Content Settings and make these changes:
- Show Title set to No.
- Show Content set to No.
- Link Type set to Box.
Skip down to Meta Settings and make set everything to No.
And lastly, go to Featured Image and change the image size to Thumbnail. If you are working on this on a desktop, at this point the image are going to look blurry and grainy and pretty bad, but that’s okay. This isn’t for desktop, when people look at those tiny photos on the phone, they’ll look fine and loading them from the smallest size is good for your page speed.
In the Style tab, remove the background color and remove all the padding, including box padding and content padding.
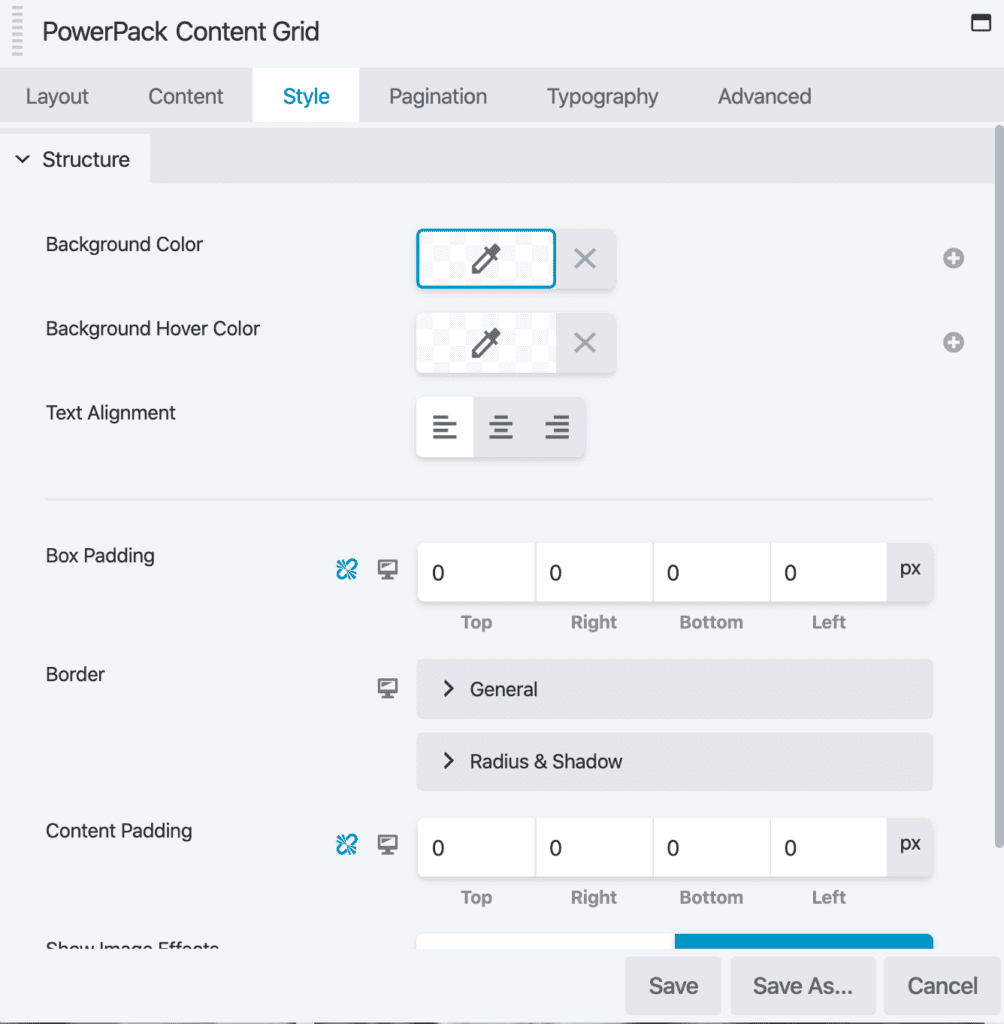
Finally, go to the Advanced tab and remove all the padding.
Next go to the Pagination tab and change it from Numbers to Scroll. This creates a page that will populate more posts as the user scrolls. I don’t recommend this on normal blog pages, but on Instagram it’s pretty slick.
That’s it for styling your content grid. Super easy, not a lot of settings to change and very minimal.
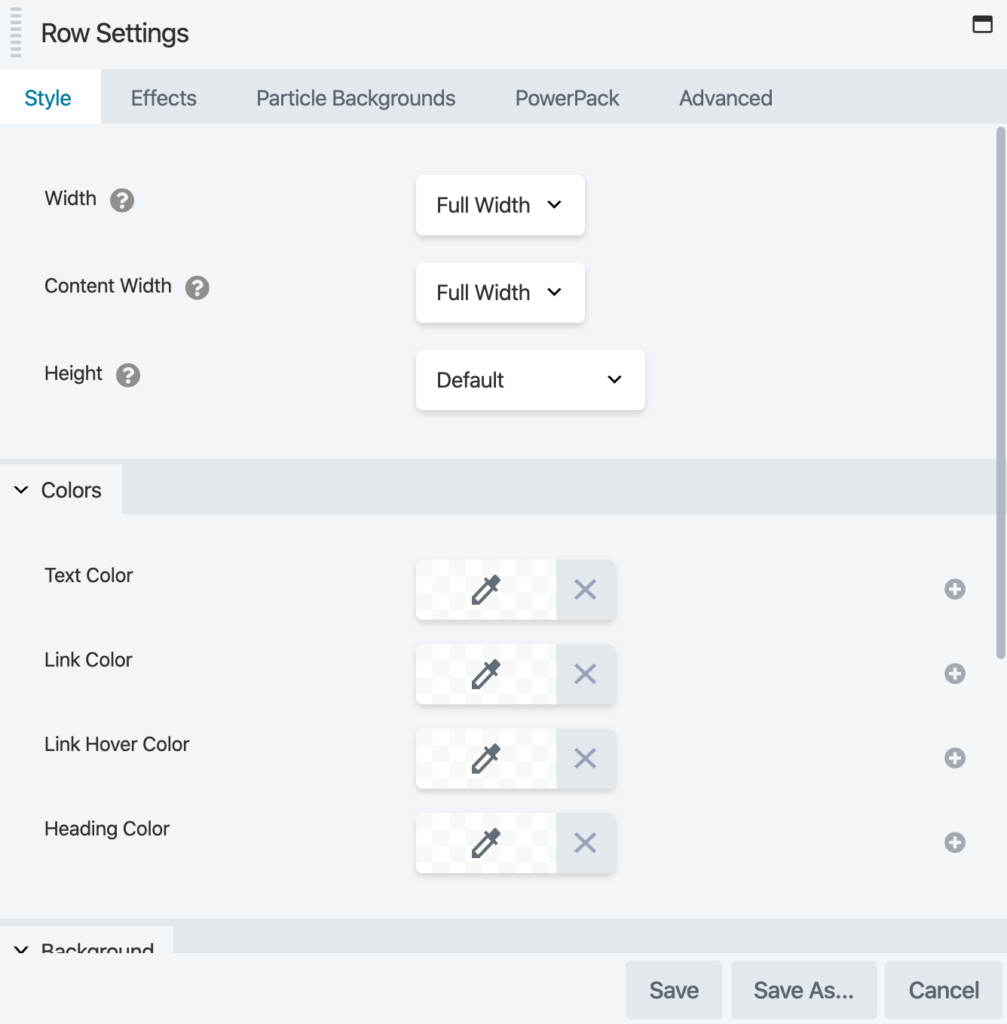
Step 5: Adjust your row settings
Depend on what global settings you have, you may need to adjust your row. For example, by default I have the content width on my rows set to Fixed. If you have that too, you’ll want to change that to Full Width.
Lastly, you’ll want to reduce the padding on the row to something small, like 5.
Now that takes care of the actual posts display for your Instagram landing page. But we’re not quite done.
Step 6: Add your logo to the top
We removed the header and footer on the landing page, but we still want to have some kind of branding on the page, so people know whose stuff they are looking at. Add a small version of your logo at the top of the page. You can make the logo link to your main site if you want to allow your users to click through.
On my page, I set up two columns with my logo on the left and a “view website” button the right, making it easy for users to click through to the rest of my website.
Then publish your page. Easy peasy, and you have a great landing page for Instagram. The last step is to copy your new URL and paste it into your Instagram profile.
Optional last step
If you stop here, then it’s very possible that your new page could get picked up by the search engines and indexed, meaning that regular searches on computers etc could wind up landing no your Instagram landing page. For me, I don’t want that page in the search results, that’s a special landing page for Instagram.
Luckily, we can choose what gets indexed in the search engines. Here’s how to set your page not to be indexed if you are using the Yoast plugin.
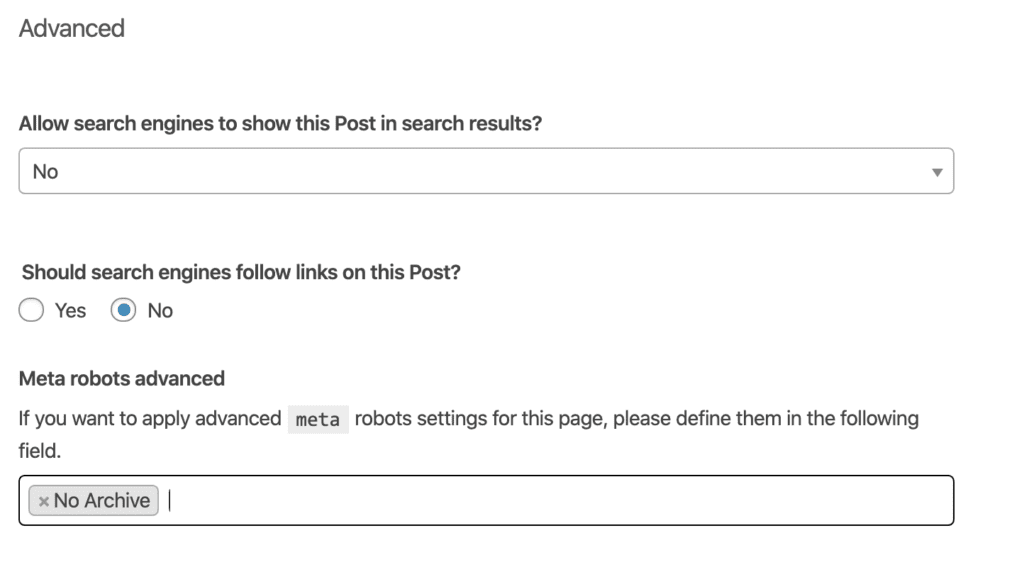
In your Yoast meta box, go to the Advanced tab (the last one) and make these changes:
- Allow search engines to show this Post in search results? Set to No.
- Should search engines follow links on this Post? This can really be either. This question is about whether the search engines should follow the links on the page even if they don’t index the page. If you already have a blog page that is indexed, then this probably doesn’t matter.
- Meta robots advanced: Set to No Archive.
There you have it, that’s how to create an awesome Instagram landing page in no time.

Amy Masson
Amy is the co-owner, developer, and website strategist for Sumy Designs. She's been making websites with WordPress since 2006 and is passionate about making sure websites are as functional as they are beautiful.