

When you hear image optimization, the first thing that come to your mind is probably clarity or image size. And these things are important, but those don’t have much effect on SEO (Search Engine Optimization.) But there are several tricks you can use to enhance your on-page SEO using images.
When a search engine is indexing the page on your site, they can’t actually see the image. It’s not a human set of eyes that sees an image and says, “Okay, that’s a photo of a tree.” The search engines can’t tell what your photo is of unless you tell them in your source code.
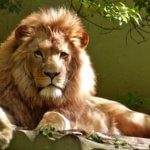

When you look at these two images, they are very different. You see a lion in one and a tree in the other. But when a search engine scans this page, they think there are two images of trees because of how I named my images. Here’s the source code for the first image:
<img src="../2018/09/tree1.jpeg" alt="Tree" width="150" height="150" />
And here’s the source code for the second image:
<img src="../2018/09/tree.jpeg" alt="Tree" width="150" height="150" />
Even though these image are totally different, as far as the search engines can tell, they are the same. That’s not good.
Photo Optimization Tip #1
Name your photos appropriately. When you download your images from your camera or phone, they come with nondescript names like IMG_7042.jpg or Photo1.jpg. If you don’t change the image name before you upload, then you’re loading a photo and giving zero information to the search engines about what that image is about.
You may be thinking, “It doesn’t matter, because my content tells Google what my image is about.” And of course, this is true. However, if your blog post is all about lions, and you add in images that are named something like lion1.jpg instead of IMG_009.jpg, that then provides reinforcement to the search engines about what your blog post is about.
Even better, if you have selected a focus keyword phrase for your page or post, you can use that focus keyword as your filename to reinforce your topic. For example, if my focus keyword phrase is “Lions in Kenya” I could then name my image file lions-in-kenya.jpg to reinforce that keyword through my image.
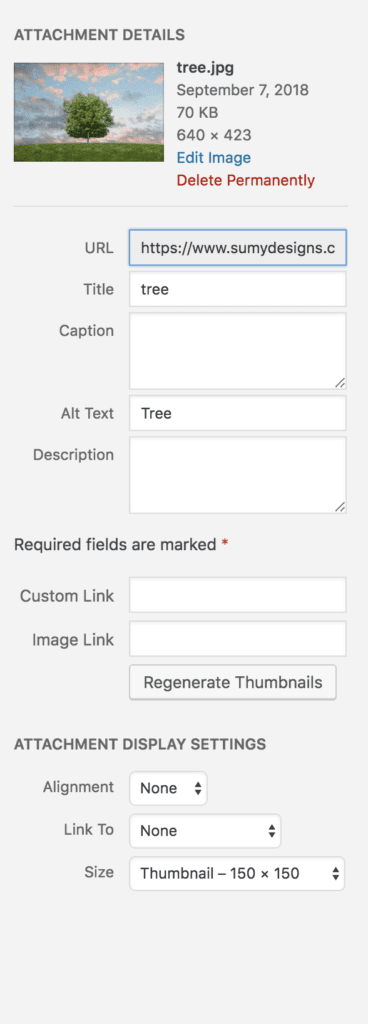
Photo Optimization Tip #2
Always add in the ALT text. ALT text, or alternate text, in its most basic form, is the text that a person would see if for some reason your image didn’t load. Most of the time, nobody ever sees the ALT text. However, if your website visitor is visually impaired, their screen reader will read that ALT text so they know what the image is about. Search engines also use the ALT text as another descriptor for that photo. If you look at my source code examples above, you can see that both of my images use ALT text of Tree, which correctly identifies one image but not the other.
How to enter your ALT text: When you upload your image, WordPress will give you options for additional information you may want to include with your image and ALT text is one of those options.
Photo Optimization Tip #3
Resize your image for the page! I know what you may be thinking, how does changing the image size affect SEO? But it does! When you take a photo, or download a stock photo, that photo by default is usually enormous and has a resolution of 300dpi. That’s because if you want to get a print of a photo, you need a high resolution to make it look great. But web resolution is 72dpi.
Why does it matter for SEO? Big images affect page load. If you upload a giant image, it’s going to take longer for your page to load and if you haven’t heard, Google is really getting pretty hardcore about page speed.
Bonus tip: If your image is in PNG format and doesn’t need to be transparent, go ahead and convert the image to JPG. JPG format is a lossy compressed file which typically has a smaller file size than a PNG. PNG is still good for icons, drawings, and images with transparent backgrounds, so use your best judgment.
Bonus bonus tip: Use a photo compression plugin to give your photos extra compression when you upload them. I like TinyPNG and Shortpixel. However, don’t use this as a substitute for resizing your images from your camera. Those images are just too big for your website.
Extra bonus tip: You can use a program like Automator for Mac to batch resize large groups of photos, which is great if you’re uploading photos for a gallery and don’t want to individually resize each image.
A few things NOT to do when optimizing your images
- Don’t stuff keywords in your image name. Naming your image light-sun-sunlight-bright-light-lightbulb.jpg is not going to enhance your SEO.
- Same goes for your ALT text, title, or caption. Keyword stuffing is never appropriate anywhere and it doesn’t work.
- Avoid spaces in your file names. Use hyphens instead.
- Avoid super long filenames, try to be descriptive but succinct.
- Don’t use a ton of images to try to get extra SEO. One image per 300-400 words is appropriate.
Yes, optimizing your images takes time to properly do, but it will bring you benefits down the road and is worth the investment.

Amy Masson
Amy is the co-owner, developer, and website strategist for Sumy Designs. She's been making websites with WordPress since 2006 and is passionate about making sure websites are as functional as they are beautiful.
This is fascinating. I knew none of this. Thanks Sumy for being a wealth of knowledge!
I try to provide helpful information as often as I can!