

If you are launching a brand new website, today’s post is for you. There’s a common misconception that just because you launch a website, people are going to be able to find it. And that is just not the case. It takes time to build up visibility in the search engines. I’ve written extensively about SEO, done several webinars on it, and it’s not something I can give you a secret to in just one blog post. However, there are several things you need to do when you launch your website to get your website found on Google faster and sooner rather than later.
Your website won’t show up in Google just because you launched it.
Google and other search engines index websites by using automated programs called web crawlers, also known as spiders or bots. Google’s web crawlers start by finding new and updated websites to index. They do this by following links from one webpage to another. If your website is brand new, guess what? Probably no other websites are linking to it. Which means it may take a while for Google to find it if we don’t take a few extra steps to make sure they know where your site is and how to find all the pages.
Step 1: Find out if your site is being indexed at all.
There’s a simple way to do this. Go to google, and type in this: site:yourdomain.com replacing yourdomain.com with your actual domain. You have to put in the exact domain, not the name of your site. Google will then tell you if there are any of your pages indexed. Here’s an example of a URL that isn’t indexed.

On the flip side, for a site that IS indexed, you’ll get something more like this.
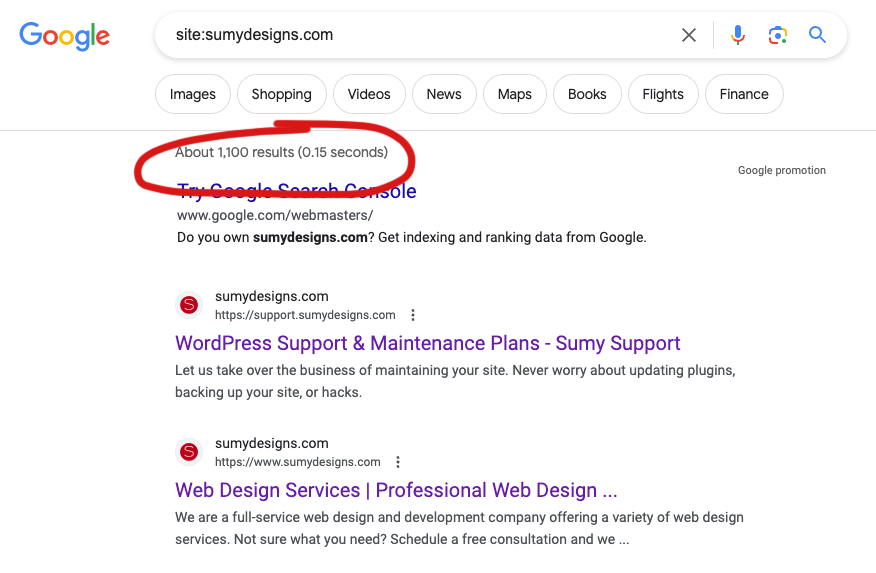
From this, you can see that Google has indexed approximately 1,100 results for this website. (I blog a lot.)
You need and want Google to start indexing your site, but if Google doesn’t know your site exists, and nobody is linking to your site, then it’s not going to get into the search engines for a while. It can take a few weeks for Google to discover new sites on its own.
Step 2: Set up Google Search Console
Google Search Console, formerly known as Google Webmaster Tools, is a free web service provided by Google that allows website owners to monitor and manage their site’s presence in Google’s search results. It provides a variety of tools and reports that help website owners optimize their websites for better search engine performance. Here is how to set it up.
- Create a Google Account (if you don’t have one): You’ll need a Google account to access Google Search Console. If you don’t have one, you can create it at https://accounts.google.com.
- Visit Google Search Console: Go to the Google Search Console website at https://search.google.com/search-console/. Make sure you’re logged in with the Google account you want to use for Search Console.
- Add Your Property: Once you’re logged in, click the “Start Now” button or “Add Property” to add your website to Search Console.
- Enter Your Website URL: In the “URL prefix” field, enter the full URL of your website (e.g., “https://www.example.com“). Ensure that you use the correct protocol (HTTP or HTTPS). Click “Continue.”
- Verify Ownership: Google will ask you to verify that you own the website. There are several verification methods available. Follow the instructions provided by Google to complete the verification.
- Verify the Ownership: After you’ve implemented the verification method, click the “Verify” button. Google will check the code or file to confirm ownership.
- Access Your Dashboard: Once the verification is successful, you’ll be taken to your Google Search Console dashboard. Here, you can start exploring the various features and tools to monitor and optimize your website’s presence in Google search.
Once you have added your site to Google Search Console, the next step is to submit your XML sitemap to search console so that Google can find all the pages of your site.
What is an XML sitemap and how is it different than a regular sitemap?
XML sitemaps and regular HTML sitemaps serve distinct purposes and have different formats. XML sitemaps, in XML format, are created for search engines to efficiently index website content, containing URLs, metadata, and various content types. They are usually generated automatically, located in the website’s root directory, and submitted to search engines. In contrast, regular HTML sitemaps are human-readable web pages intended to help visitors navigate a site, manually created and placed anywhere on the site without submission to search engines. They present a clear, organized list of links for user-friendly navigation.
Your site needs an XML sitemap. If you aren’t sure if you have one, try going to https://www.yourdomain.com/sitemap.xml (with your domain in there) and see if anything comes up. Here’s what ours looks like for Sumy Designs.

If you don’t get anything, then you need to get one. If you use WordPress, you’re in luck because a basic one is included by default and has been since 2020. However, many people prefer to add a more robust sitemap with a plugin. I use Yoast SEO on all my sites, and Yoast automatically generates a pretty good sitemap for you with no extra work.
Step 3: Add XML sitemap to Google Search Console
Now that you have your XML sitemap, head back over to Google Search Console so you can give Google the sitemap so it has a roadmap to all your posts and pages.
- Sign in to Google Search Console.
- Select Your Property: In the Search Console dashboard, choose the property (website) you want to add the XML sitemap for.
- Open the Sitemaps Section: In the left-hand menu, click on “Sitemaps.” This is where you’ll submit your sitemap.
- Submit Your Sitemap: In the “Sitemaps” section, there is a field where you can enter the path to your sitemap. For example, if your sitemap is located at “https://www.example.com/sitemap.xml,” you would enter “sitemap.xml” (without the domain) in the field.
- Click “Submit”: After entering the sitemap path, click the “Submit” button. Google will then add your sitemap to the list of submitted sitemaps.
- Verify Sitemap Status: Once you’ve submitted the sitemap, you’ll see its status in the list. Google will display information about the number of URLs submitted and the number of URLs indexed from your sitemap. It may take some time for Google to crawl and index the pages in your sitemap, so keep an eye on this section for updates.
- Check for Errors: Google Search Console will also alert you to any errors it encounters when crawling your sitemap. Be sure to address and fix any issues to ensure your pages are correctly indexed.
Step 4: Ask Google to recrawl your URLs
Use the URL Inspection tool within Google Search Console to request a crawl of your site.
- Log In to Google Search Console: Sign in to your Google Search Console account using your Google account credentials.
- Select Your Property: Choose the property (website) for which you want to request a crawl from the list of properties in your Search Console dashboard.
- Access the “URL Inspection” Tool: In the left-hand menu, click on “URL Inspection.” This tool allows you to inspect and request indexing for individual URLs on your site.
- Enter the URL: In the “URL Inspection” tool, enter the specific URL of the page you want to request indexing for. Make sure the URL is on the site associated with the selected property in Search Console.
- Inspect the URL: Click the “Inspect” button to have Google check the status of the URL.
- Review the Inspection Results: Google will provide information about the URL’s status. If it’s indexed, you’ll see a message indicating that. If it’s not indexed or if there are issues, you’ll see details about why.
- Request Indexing: If the URL is not indexed, you can request indexing by clicking the “Request Indexing” button. This tells Google to crawl the page and update its index.
- Check Indexing Status: After requesting indexing, you can monitor the status of the request in the “Coverage” section of Google Search Console. It will show whether the request was accepted and whether Googlebot has crawled the URL.
- Repeat for Other URLs: If you want to request indexing for multiple URLs, repeat the process for each one individually. However, if you’ve submit a sitemap, this is usually not necessary.
Step 5: Link to your site
One of the most common ways that Google finds site is by following links, so the more links you can add to your site the better. Share it on your social channels. Ask your family and friends to share it. Add it to your Google My Business listing. Add it to your bio on Instagram. Announce the site in your newsletter. Add your URL to any business directories you may be in, including industry directories or things like the Chamber of Commerce. Go on podcasts to talk about your business and ask the podcaster to link to your website. There are tons of ways to start getting links to your website (called backlinks) and the more of these quality links you get, the better.
Don’t misconstrue these instructions as the way to get #1 in the search results. That’s not what I’m explaining. This is just to get INTO the search results. If people are going to search for you by name, or even by URL, then your site needs to be indexed pronto. These steps will get you on the board and get your website to found on Google. Getting to #1, that’s an entirely different matter.

Amy Masson
Amy is the co-owner, developer, and website strategist for Sumy Designs. She's been making websites with WordPress since 2006 and is passionate about making sure websites are as functional as they are beautiful.