Two things I love: Calendly and WordPress. Calendly is an online scheduling and appointment booking tool that allows individuals and businesses to streamline the process of setting up meetings, appointments, and events. It is designed to make it easy for people to schedule time with you without the back-and-forth emails and phone calls typically involved in finding a suitable meeting time. WordPress is the content management system running over 40% of all websites. If you have a WordPress website, and would like to offer online scheduling, Calendly might be a great option.
Calendly offers the following features:
- Availability management: You can set your availability preferences, such as working hours and time slots, and Calendly will display those open slots to people who want to schedule time with you.
- Customization: You can customize your scheduling links with your branding, add your logo, and personalize the messaging.
- Integration: Calendly can be integrated with various calendar platforms like Google Calendar, Outlook, and others, ensuring that your scheduled appointments are automatically synced with your existing calendar.
- Automated notifications: It sends email notifications to both you and your invitees when an appointment is scheduled, reminding both parties of the upcoming meeting.
- Time zone support: Calendly helps with handling time zone differences to ensure that appointments are scheduled correctly across different regions.
- Buffer time: You can set buffer times between meetings to allow for breaks or preparation.
- Meeting types: Calendly supports the creation of different meeting types, each with its own duration and purpose, making it versatile for various scheduling needs.
- Payment integration: In addition to scheduling meetings, Calendly offers features that allow you to collect payments for appointments, making it useful for businesses that offer paid services.
I started using Calendly many years ago, because I wanted the ability to allow people to find meeting times with me without the back and forth of trying to pick a day and time. People can see my availability and choose a time that works for them. It shows the options in their own time zone, so it erases confusion.
We also use a number of integrations, including integration with Zoom so that when we are scheduling online meetings, the Zoom link is automatically added to the event so everyone can hop on with ease.
And it syncs with my Google calendar, so I am never overbooked. If it’s not on the Google calendar, it doesn’t exist. That’s my motto.
So how do you use Calendly and WordPress together?
There are actually several ways you can make this happen and it really depends on what you think would be ideal for your target audience. I’m going to cover several in this post. The easiest way, in my opinion, is to simply add a link to a button or the navigation menu on your website.
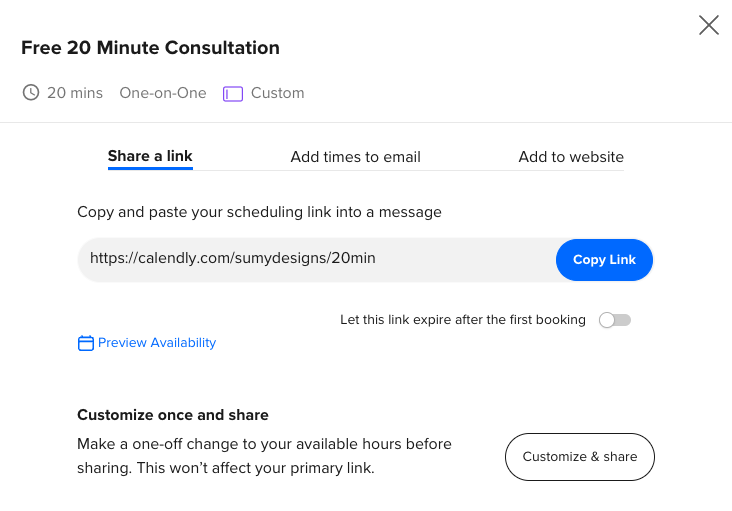
First, you’ll need to find the link for your event. In Calendly, open the event you want to link to and click on the blue “Share” button at the top of the page. You’ll be given a link to use. You can easily click the Copy Link button to copy that link.

To add a button in WordPress using Gutenberg blocks, you can follow these steps:
- Create or Edit a Post/Page: Start by creating a new post or page or editing an existing one.
- Insert a Block: In the Gutenberg editor, click on the “+” button or an empty block area to insert a new block.
- Search for the Button Block: In the block search bar, type “Button” to find the “Button” block. Click on it to insert the block into your content.
- Customize the Button: Once you’ve added the Button block, you can customize it:
- Button Text: Edit the button text by clicking on the default “Button” text in the block and typing your desired text.
- Link URL: You can specify the URL the button should link to. This is where you paste your Calendly link.
- Button Alignment: You can set the alignment of the button (left, center, or right) in the block settings under the “Block” tab.
- Button Style: You can choose from different button styles (outlined, squared, or rounded) in the “Styles” section of the block settings.
- Button Size: You can adjust the button’s size (small, medium, large) in the “Styles” section as well.
- Button Colors: You can choose the button’s background and text color under the “Styles” section. You can also create custom color palettes.
- Advanced Settings: For more advanced customization, you can add custom CSS classes and additional HTML attributes under the “Advanced” section in the block settings.
- Publish or Update: Once you’ve customized the button block to your liking, click the “Publish” or “Update” button to save your changes.
- Preview or View Page: You can then preview your page to see how the button appears to your visitors, or view the published page.
That’s it! You’ve added a button to your Calendly scheduling page using Gutenberg blocks. I like this approach because it’s easy and a good call-to-action. Make sure to name your button something like “Schedule Appointment” so visitors know exactly what will happen when they click on it.
To add a Calendly link in your main WordPress navigation menu
- Find your Calendly link the same way as in the previous eample.
- Log in to your WordPress Admin Dashboard.
- Go to the Menu Settings: In your dashboard, navigate to “Appearance” > “Menus.” This will take you to the WordPress Customizer, where you can manage your navigation menus.
- Select a Menu: If you already have a menu you want to add a custom link to, select it from the “Select a menu to edit” dropdown. If you don’t have a menu yet, you can create one by clicking the “Create New Menu” button and giving it a name.
- Add a Custom Link: In the left panel of the menu editor, you will see a “Custom Links” section. Here’s how to add a custom link:
- In the “URL” field, enter the web address (URL) you want your custom link to point to. This is where you paste in your Calendly link.
- In the “Link Text” field, enter the text that you want to display for the custom link in your navigation menu. Something like “Schedule a Call” will work.
- Click the “Add to Menu” button.
- Position the Custom Link: You can now see your custom link in the list of menu items on the right. You can drag and drop it to position it where you want it to appear in your menu. You can also nest it under existing menu items if you want it to be a submenu.
- Save the Menu: After adding and arranging your custom link, don’t forget to click the “Save Menu” button to save your changes.
- Preview or Update: You can preview your website to see how the custom link appears in the menu. If you are satisfied with the placement and appearance, click the “Publish” or “Update” button to save the changes.
Your custom link should now be part of your WordPress navigation menu. Visitors to your website will be able to click on it and be directed to your Calendly scheduling page.
How to Embed Calendly into WordPress
If you decide that you don’t want to use a button or add it to the navigation, Calendly gives you some great options for embedding your events into it.

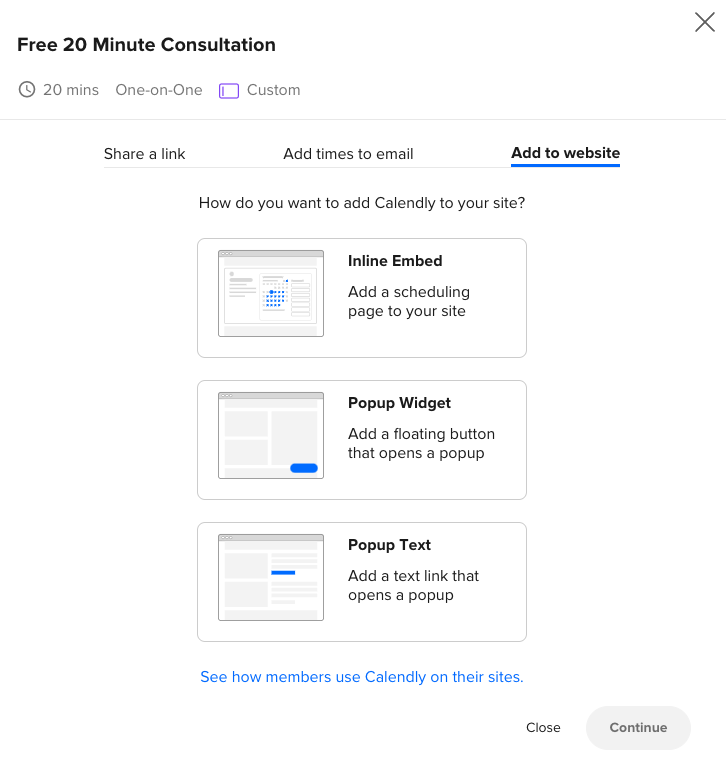
On the opposite side of where you get a text link, you can choose different options for adding Calendly to your website. The three options you are given are Inline Embed, Popup Widget, and Popup Text.
Inline Embed
This option lets you add a scheduling page to your site. This works with any website, not just WordPress. If you click on that choice, it takes you to another page where you can select your color options and then copy some code.
To add that code to your WordPress site using Gutenberg, you will add a new HTML block, and paste that code into the block. Here’s what that code looks like for me.
<!-- Calendly inline widget begin -->
<div class="calendly-inline-widget" data-url="https://calendly.com/sumydesigns/20min" style="min-width:320px;height:700px;"></div>
<script type="text/javascript" src="https://assets.calendly.com/assets/external/widget.js" async></script>
<!-- Calendly inline widget end -->
And here’s how it looks on your website. Note that I didn’t do any styling on this at all, this is just the default options.
This basically just adds the calendar to your site in an iframe. (An iframe, short for “inline frame,” is an HTML element used to embed another HTML document or web page within the current web page. It allows you to display content from another source or website within a specific area of your own webpage. Iframes are commonly used to integrate external content, such as videos, maps, or widgets, into a web page seamlessly.)
The example I used added my calendar, but what I don’t like is that it doesn’t all fit, and there are scroll bars that let you scroll up or down. You can adjust this in your code by changing the height attribute until it fits. Make sure to test it on various devices so you know it looks good on all.
Popup Widget
A popup widget will give you a button that floats on your site, that allows users to click on that button at any time and schedule a call. If you click on that option in Calendly, it’ll again give you some styling choices and then let you copy the code. Here’s what my code looks like:
<!-- Calendly badge widget begin -->
<link href="https://assets.calendly.com/assets/external/widget.css" rel="stylesheet">
<script src="https://assets.calendly.com/assets/external/widget.js" type="text/javascript" async></script>
<script type="text/javascript">window.onload = function() { Calendly.initBadgeWidget({ url: 'https://calendly.com/sumydesigns/20min', text: 'Schedule time with me', color: '#0069ff', textColor: '#ffffff', branding: undefined }); }</script>
<!-- Calendly badge widget end -->
And, if you look at the bottom right corner of this blog post, you’ll see that scheduling button. If you click it, it’ll give you a clean popup window with the calendar times.
To add this code to any page of your WordPress website, you would copy the code and place it in an HTML block.
If you want to add it to ALL the pages of your website, you would need to add it into the header or footer of your site, or some other global element that works on all pages. Some themes even have designated spots for you to paste scripts like this to work on all pages. I usually stick things like that in the footer. If you do that, then the button will float on every page of your site.
Popup Text
This is different than the other popup in that it provides you with a text link you can use within the body of your page or post to allow people to click and activate that popup. What’s different about this is that you can place this anywhere you want on your page or post, rather than having it float in the corner.
Here’s what my code looks like:
<!-- Calendly link widget begin -->
<link href="https://assets.calendly.com/assets/external/widget.css" rel="stylesheet">
<script src="https://assets.calendly.com/assets/external/widget.js" type="text/javascript" async></script>
<a href="" onclick="Calendly.initPopupWidget({url: 'https://calendly.com/sumydesigns/20min'});return false;">Schedule Now</a>
<!-- Calendly link widget end -->
And here’s the output:
Schedule NowThe Plugin Option
If pasting in code isn’t your cup of tea, I have one more option to use Calendly with WordPress, and that’s with a plugin. There’s a plugin in the repository called Embed Calendly. Once activated and connected to Calendly via API, you can use shortcodes within the site to add your Calendly links and buttons.
Personally, I don’t think this is any easier than using the options provided by Calendly.
Amy Masson
Amy is the co-owner, developer, and website strategist for Sumy Designs. She's been making websites with WordPress since 2006 and is passionate about making sure websites are as functional as they are beautiful.
