

Hey look, I’m talking about site security again! It’s a favorite topic of mine, but mostly because I really, really hate cleaning up a hacked site. Last week, I answered the question of whether WordPress is secure (short answer, yes). But today I want to talk about security plugins. What they are, what they do, and how to set them up.
What is a security plugin?
A security plugin is an extension for WordPress that enhances your site’s security. The three top dogs in the field include WordFence, Sucuri, iThemes Security (formerly known as Better WordPress Security), and All in One WP Security & Firewall.
I have personally used all of these plugins except All in One, but I do plan to test it out on the next site I make so I can evaluate it. The other three are all good, solid, plugins and I would recommend any of them depending on your needs.
Note: Using a security plugin does not take the place of maintaining your updates and using strong passwords. Even an out of date security plugin can become exploited (this has happened.) Don’t make the mistake of thinking you can install and configure a plugin and then never look again. It’s not that simple.
Anyway, a good security plugin will take your site’s security up a new level by doing a few things that you probably can’t do on your own. On most sites, I use iThemes Security because it’s one I’ve used for a long time and feel comfortable with, but like I said, these are all good plugins and you can choose the on you like the best.
How to Configure iThemes
After installing and activating your plugin, the first thing you need to do is sign up for your API key. It’s free and it only takes a button click. Why? Getting the API key allows you to integrate the network brute force protection.
Network brute force protection takes this a step further by banning users who have tried to break into other sites from breaking into yours.
This means that your site will start blocking IPs that have attempted to bust into other sites before they try to break into yours. So get that API for sure.
When you login, there are a number of options to configure. This isn’t an “activate and go” plugin. You need to make some configurations and choices to create the most secure environment, so I thought I’d just go over what my choice settings are.
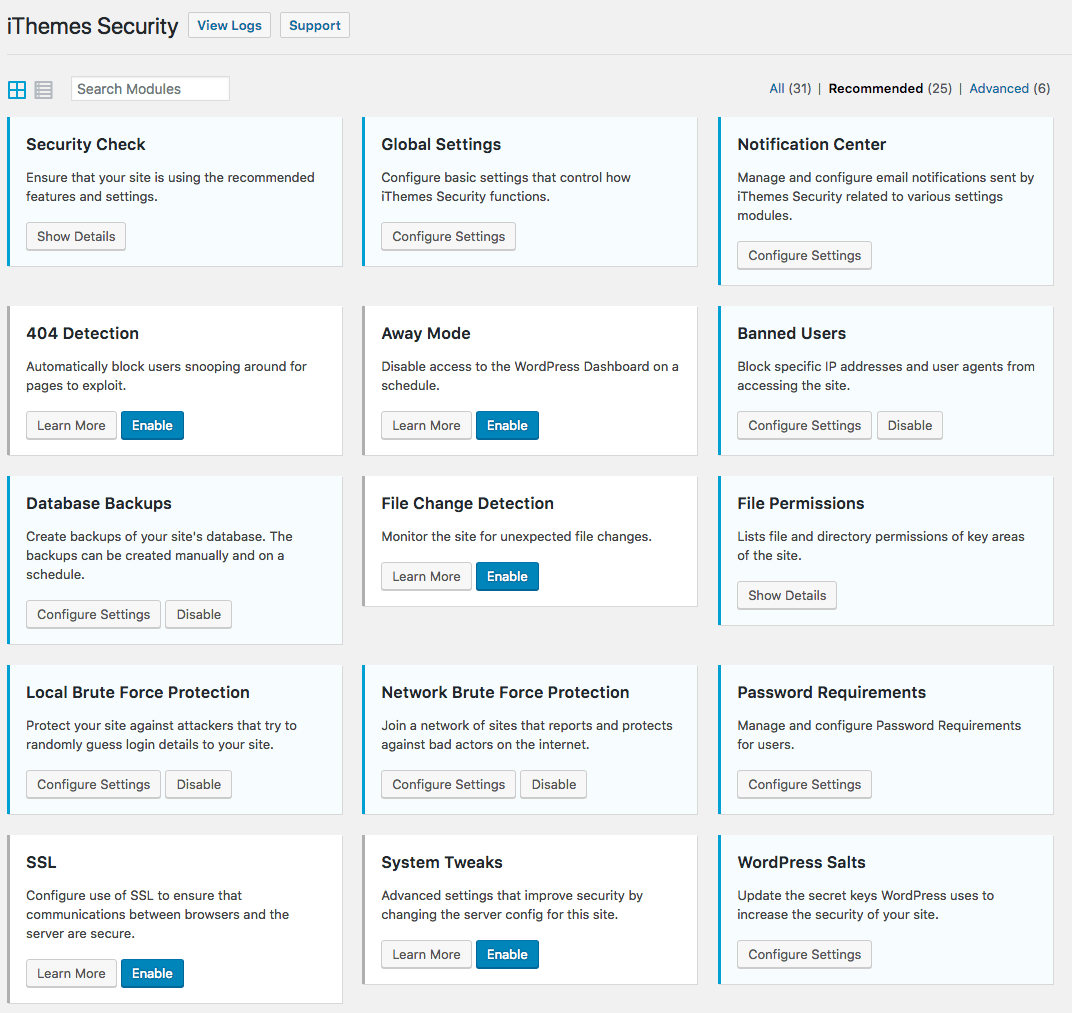
Security Check
This isn’t a setting, but just a check of your security, so nothing to configure here.
Global Settings
These I typically leave as is, the defaults work well.
Notification Center
This one is really a personal preference about how much you want to get notified. I tend to turn off Site Lockout notifications, because if your site gets hit with a brute force attack you can get notified 100 times in an hour. Keeping the security digest enabled is a good option to keep up with your site’s security without nonstop notifications.
404 Detection
This isn’t the site scanning and finding 404 errors for you. This is the site tracking when IPs start hitting a lot of 404s on your site. Usually if one IP is repeatedly hitting your site getting 404s in a short period, that means that the site is being scanned for a vulnerability. This setting detects and locks out the user. So I typically enable this and leave the defaults in place.
Away Mode
This is a great option, but I almost never enable it for clients. Away mode lets you turn off the login page for your site during times when you know you won’t be logging in. Typically during the night time hours. Keeps people from being able to brute force their way in while you sleep. Since I don’t know what hours my clients keep, I keep this off but if you know you’ll never login to your site between 1 and 5 AM, by all means, enable this feature.
Banned Users
With this option, you can ban users from your site. There’s a spot for you to manually enter IPs you want to block, but also it will start picking up users who have had failed logins too many times and automatically add them to the list. I love this feature, but if you are a person who tends to forget your password, this may not be a setting for you. I’ve had more than one client lock themselves out of their site! I also make a point to check the box for Enable HackRepair.com’s blacklist feature because it pulls in a list of known bots and blocks them from your site.
Database Backups
I disable this feature because I already do my own backups of my site and, for any client who signs on for a Sumy Support plan, we back up their site everyday anyway. Some hosts like FlyWheel and Kinsta (affiliate links) do daily backups as well. (It’s just good sense to have a backup of your backup.)
File Change Detection
This setting allows you to keep a log every time a file is changed on your site.
File Permissions
Just a check so you can view what your permissions are.
Local Brute Force Protection
This remains on but I take it a step further and check the “Immediately ban a host that attempts to login using the “admin” username” box. (Don’t do this if your username is admin. Also, don’t use ‘admin’ as your username.) I also change the minutes to remember a bad login from 5 to 60, but if you’re a person who tends to forget your password, this option may not be one you want to enable. (Try using Lastpass to remember your password.)
Network Brute Force Protection
If you signed up for your API, this should be enabled and working, no further configuration needed.
Password Requirements
Make sure this is enabled and you’ve chosen that all users require strong passwords. Don’t make me give you a password lecture. Stop using your dog’s name, your birthday, or password as your password.
SSL
If your site uses an SSL (and it should) then definitely enable this option. Choose Advanced for your settings and enable Front End SSL Mode (whole site) and Force SSL for Dashboard.
System Tweaks
By default, this is left disabled, but I always enable it. There are a lot of useful options in here. I almost put a check in every option under System Tweaks. In my opinion, these are all very important. They prevent important files like your config and htaccess file from being written too, disable directory browsing, and disable anyone from executing PHP files into from your Uploads, Plugins and Themes directories.
One caveat, if you have a plugin like a security plugin that needs to write to the htaccess or wp-config files, don’t check the System Files box or it will block those changes.
WordPress Salts
I don’t change these unless the site has been hacked.
WordPress Tweaks
In my opinion, along with the System Tweaks, this is one of the most important settings. By default it’s enabled but most of the settings are left up to you to choose. I have a tendency to check all the boxes, but a few things you should be aware of. The “File Editor” setting makes it so you can’t make edits to your theme or plugins from the Appearance menu. If that’s something you like to do, then don’t check this box. But definitely check this box because you shouldn’t be editing your theme and plugins from the Appearance menu. 🙂
I almost always also Disable XML-RPC unless I’m using a plugin that needs it. For most simple sites, this is fine. I also change the Rest API access to Restricted.
And that’s it! Security has been enhanced.
A few notes about good web hosts
WordPress specific web hosting has gotten much better over the last few years, and if you’re using one of these providers (like FlyWheel and Kinsta – affiliate links), then you don’t need to do any extra security plugins. They take care of all of that for you, which is super nice and one of the reasons I recommend them. I’ve never had a site hacked on one of these hosts. (knock on wood)

Amy Masson
Amy is the co-owner, developer, and website strategist for Sumy Designs. She's been making websites with WordPress since 2006 and is passionate about making sure websites are as functional as they are beautiful.