There are tons of ways to accept payments on your website, and the one I use most often is with Gravity Forms. So I thought today I’d do a step-by-step on how to accept online payments using Gravity Forms.
Why add a payment form?
Adding a payment form to your website can bring a lot of benefits for both you and your customers. Here are some of the key advantages:
For you:
- Increased sales and revenue: Offering a convenient online payment option makes it easier for customers to complete purchases, potentially leading to higher conversion rates and increased sales.
- Improved cash flow: Online payments are processed instantly, so you receive your money faster compared to traditional methods like checks. This can significantly improve your cash flow and overall financial health.
- Reduced administrative burden: Manual payment processing involves a lot of paperwork and time spent chasing invoices. Online payments automate the process, saving you time and resources.
- Reduced errors: Manual data entry can lead to errors in billing and record keeping. Online forms eliminate this risk, ensuring accurate information and smooth transactions.
- Simplified operations: Managing recurring subscriptions, memberships, and donations becomes easier with automated online payments, streamlining your operations and reducing workload.
- Access to a wider market: Offering online payments allows you to reach customers beyond your physical location, expanding your market reach and potential customer base.
For your customers:
- Convenience and accessibility: Customers can purchase your products or services anytime, anywhere, 24/7. This convenience can significantly improve their experience and satisfaction.
- Faster checkout process: Online forms streamline the checkout process, eliminating lengthy forms and multiple pages. This makes completing purchases quicker and easier for customers.
- More payment options: You can offer various payment methods like credit cards, debit cards, and e-wallets, catering to different customer preferences and increasing the likelihood of completing a purchase.
- Improved security: Secure online payment gateways protect customer data and ensure safe transactions, building trust and confidence in your business.
- Real-time transaction tracking: Customers can track their orders and payments in real-time, enhancing transparency and peace of mind.
Overall, adding a payment form to your website is a smart move that can benefit both your business and your customers. It improves convenience, efficiency, and security, ultimately leading to higher sales, better cash flow, and a more successful online presence.
What methods of payment can you set up with Gravity Forms?
There are a lot of different options when it comes to accepting payments. You can accept payments via one or multiple payment gateways. A few of the options include: Stripe, PayPal, Square, 2Checkout, and Authorize.net. If you are already using one of these with your business, then you are one step down in this process.
Step 1: Decide on your payment gateway
If you don’t already have a payment gateway you are using, you’ll need to choose one. These gateways are add-ons for Gravity Forms with either the Pro or Elite license. They are not included in the Basic license.
I am personally a fan of Stripe, I use it on many sites, and it integrates with lots of systems. Here’s a breakdown of the rates for the various payment forms.
| Gateway | Rate |
|---|---|
| Stripe | 2.9% + 30¢ |
| PayPal | 3.49% + 49¢ |
| Square | 2.9% + 30¢ |
| 2Checkout | 3.5% + $0.35 |
| Authorize.net | 2.9% + 30¢ plus $25 monthly fee |
Mostly the fees are around the same, but I know a lot of folks get surprised to see PayPal is on the higher end. It used to be in the same ballpark as the others, but it went up a few years ago. Use this information and decide on what one you want to use. Also checkout the limitations, because some processors don’t allow payments to be processed or certain industries (gambling, etc.)
Figure out which one you want to use, sign up for an account, and make sure you complete it, and that it is activated.
Step 2: Activate the correct add-on for your gateway
All the payment gateways aren’t activated by default, you’ll need to turn on the one you want. As I mentioned earlier, you’ll need either a Pro or Elite license to use some of these gateways. (And if you are a client of ours, you already have access to the correct licenses do use these add-ons.)
In your Dashboard, go to Forms->Add-Ons and find the payment gateway you want to activate, click the Install button, and then activate.
Now, you need to connect your gateway to Gravity Forms. Go to Forms->Settings and you’ll see a new option there for whatever gateway you picked. There may be different steps depending on the gateway, but it will walk you through it. Usually it involved logging into your account at your payment gateway and authorizing that connection.
Step 3: Make your form
You’ll start by making a basic form in Gravity Forms, including any field that you need to collect information for, such as name, company name, email address, invoices number, and phone number. If you need their address, or any other information, you can add in those fields.
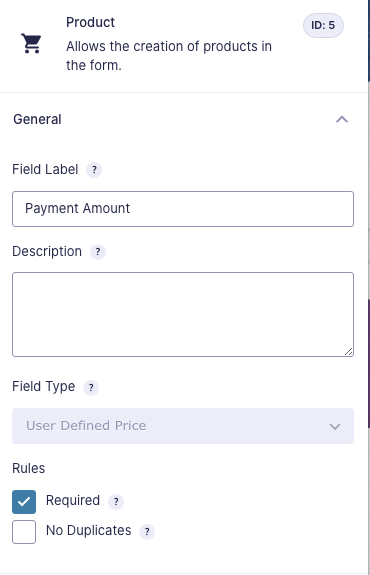
Next, you need a Product field. This is where people can enter in the amount they want to pay. Add a product field, choose “User Defined Price” and that creates a field that allows users to insert how much they want to pay.

And the last field you need to add is your credit card field that goes along with whatever payment gateway you chose. Once you install and activate the right add-on, there will be a new field in your Advanced options for payments. Add that field to your form and save your form.
Step 4: Set up your feed
You created the form, but that is not the last step. That’s never the last form step! Now you have a form, but you need to connect this specific form to your payment gateway via a feed. When you create a payment form using Gravity Forms, you need to set up a feed to specify how the form data should be processed and transmitted to the payment gateway. This typically involves configuring parameters such as the payment gateway credentials, pricing details, and other transaction-specific information.
The feed acts as a bridge between your Gravity Form and the payment gateway, ensuring that payment transactions are securely processed and relevant information is transmitted between the two systems. It allows you to customize the payment process according to your needs, such as specifying products or services, setting up recurring payments, and handling various payment scenarios.
Each of these feeds for the different payment gateways is a bit different, so I’m going to link to the different documentation to show how to set up the feeds.
- Set up a Stripe Feed
- Set up a PayPal Feed
- Set up a Square Feed
- Set up an Authorize.net Feed
- Set up a 2Checkout Feed
Step 5: Set up your confirmation message
You thought that last one was the last step, didn’t you? It’s not! You also need to set up your confirmation message. A confirmation message in Gravity Forms is the message displayed to users after they submit a form, or in this instance make a payment. It serves as confirmation that their form submission/payment was successful.
There are three kinds of confirmation messages in Gravity Forms: Message, Page, and Redirect.
Message: Displays a message of your choosing on the same page that the form is on, after a user hits submit. This is the default.
Page: This takes the user to a specific page that you designate after they hit submit.
Redirect: This redirects the user to any page or website you designate after they hit submit. This is similar to the Page option, except with Page you have to choose a page of your site, and with Redirect you can put any page on the Internet. For example, if you want someone to schedule an appointment after they pay, you can redirect them to your calendar booking system (like Calendly.)
How to set up your confirmation
Choose what type of confirmation you want. Then go to your form’s settings and choose Confirmations. By default, there will be a message there that say something to the effect of thank you for contacting us, we’ll get back to you soon. You can change this message to anything you want, or you can use the redirect to a page or other website option.
Step 6: Set up your notifications
Confirmations and notifications are the most overlooked step in creating forms. These are steps that are needed to be completed on every form, not just payment forms.
In Gravity Forms, notifications are messages or alerts that are sent to specified recipients when a form is submitted. These notifications provide a way for you to receive information about form submissions in real-time. Notifications can be configured to send emails to one or more recipients, and they can include details about the submitted form entries. At the very least, you’ll probably want to configure a notification to go to you so you are alerted that a payment was made.
You can also set up a notification to email the person making the payment a notification that the payment was received.
Step 1: Add New Notification
- In the form editor, go to the “Settings” tab.
- Click on “Notifications.”
- Under Notifications, click on “Add New.”
Step 2: Set Up Email Notification Details
- Send to Email: Enter the email address where you want to receive the notification.
- From Name: Set the name that should appear as the sender.
- From Email: Set the email address that should appear as the sender.
- Reply To: Optional. Set an email address to receive replies.
- Subject: Customize the email subject.
- Message: Customize the email message. Use merge tags to include form field values.
Step 3: Save Notification
- Click “Save Notification” to save your email notification settings.
Finally, you’re done! Hooray!
Oh wait, I lied. I have one more step.
Step 7: Test your form
It is absolutely essentially that you test out your payment form to make sure it works before you start directing customers there. You need to verify that the payment goes through, that your notifications work, and that you are happy with the easy of use and the confirmation message.
Ok, that is really the final step. Now you are ready to release your form into the wild. Want to see one in action? Head on over to our payment form and send us some money if you are so inclined. (I kid!)
Amy Masson
Amy is the co-owner, developer, and website strategist for Sumy Designs. She's been making websites with WordPress since 2006 and is passionate about making sure websites are as functional as they are beautiful.
