

If you run a business that serves clients and sends invoices, you may be wondering about a way to expedite the payment process. Allowing payments right on your website is a super fast and easy way to make it easy for your customers to pay you. It’s not as difficult or expensive as you may expect!
There are a number of ways to accept payments on your website, but today I’m just going to go over one simple way to make it happen that you can set up with ease.
Gravity Forms + Stripe
For me, the simplest method of integrating payments on your website is to set up a simple form using Gravity Forms and integrate it with the payment gateway Stripe. Gravity Forms has an add-on that makes integrating with Stripe easy for allowing payments on your website. That’s how we have our own payment form set up here. (Feel free to send us some money if you want to test it out.) 🙂
Things you need to set this up:
Step One:
Set up and activate your Stripe account. Stripe is free to set up and does not include a monthly fee and has a very competitive rate of 2.9% plus $0.30 per transaction. Once you sign up for your account, be sure you go through all the steps to activate it. You have to enter your personal or business information to verify your business, and you’ll have to enter your bank routing and account number, so that Stripe can deposit your money into your bank.
It’s easy to sign up for an account and forget to activate it, but you can’t get your API keys to integrate the payment gateway until you activate your account, so don’t forget that step!
Step Two:
Set up your payment form. If you don’t have Gravity Forms set up on your site, go ahead and install it and begin setting up your form. When a payment is submit, you will get an email with the details of whatever information you want to collect. Typically fields on a payment form include Name, Invoice Number, and Payment Amount but you can include whatever information you’d like to collect. Collecting a phone number and email address isn’t a bad idea either.
Step Three:
Set up your API keys. Go to Forms ->Settings and click on Stripe. From here, you can select Live or Test. Start with test if you want to run some test transactions to make sure it works. Then add in your Test and Live keys, which you can find in your Stripe dashboard. Go to Developers->API keys. It’s really as simple as copying the keys and pasting them into the right boxes.
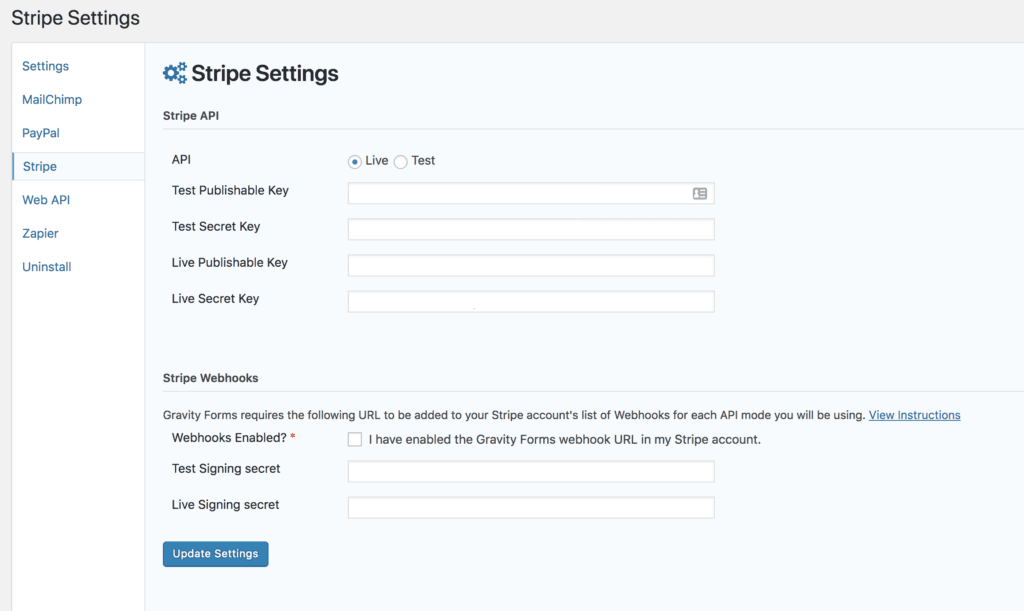
You also need to enable webhooks for your form. This is also very simple, you click on the “view instructions” link in your form settings and it will give you the URL. Then you copy that URL and go to Developers->Webhooks and click the +Add Endpoint button and paste in the URL. That’s really it. Then click update settings.
Step Four:
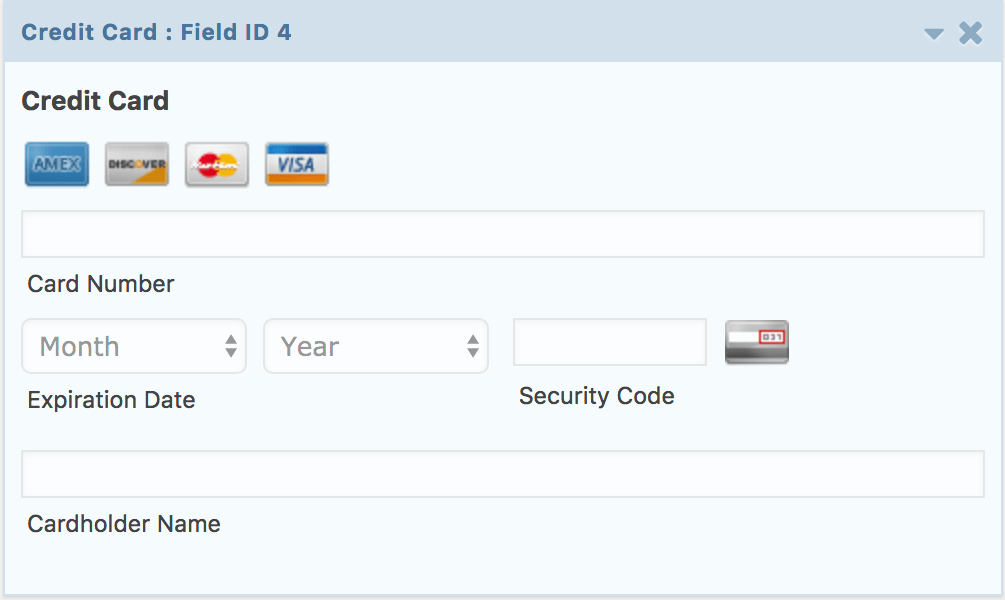
Once you activate the Stripe add-on within Gravity Forms, there will be a new option in the pricing fields for credit card fields. Add that field set to your form, which will allow your user to enter their credit card data.
Step Five: (Last one!)
Now, we have a form set up and we have Stripe set up, we need to make Stripe communicate with your form. In your site, each form has a variety of settings including email confirmations, email notifications, and once you’ve enabled the Stripe add-on, Stripe settings. For your specific form, go to Settings->Stripe and add in a Stripe feed. It’s really simple. Click the Add New button.
Give your feed a name. This can be any name you want, it just identifies what this is for. If it’s a simple payment form, you can name it “Business Payment Page.” It can really be anything you want. If you have more than one payment form, it’s a good idea to make the name something to help identify which form this is.
Next, select your Transaction Type, which in this case is Products and Services.
Once you select your transaction type, a few more options will appear, asking you what the payment amount is (should default to Form Total.) Then you can click Update Settings.
Once you’ve done this, feel free to test your form. If you had it in Test mode, you can enter a test credit card number (4444 4444 4444 4444) with any future date and run a transaction.
Once it works, be sure to go to your Stripe settings and change it to Live mode!
A few notes
- You must have an SSL installed and configured on your site to accept payments online. If you aren’t sure, look at your browser window next to your URL. Is there a padlock? Still not sure? Paste your URL into this online SSL Checker. (Note, it will tell you if your server has an SSL installed, but not if your site is actually using the SSL, which is a bit different. If you don’t have the padlock showing, you can use this SSL checker to find out what’s not right.
- You can set up customer receipts either within your Stripe settings or within your Gravity Forms settings. I have had clients who prefer the receipt to come from Stripe and some who have preferred to set up custom notifications with Gravity Forms. It’s a good idea to have some kind of notification so they are aware that their payment was successful.
Is using a payment form on your website secure?
Yes, but with a few conditions. First, make sure you are keeping your website software up to date. If WordPress or your plugins become out of date, they can become a target for hackers. If you aren’t sure you’ll be able to maintain updates on your site, sign up for a support plan to make sure they get done.
Of course, make sure your SSL is active, installed and working. Your SSL is what encrypts your customer’s credit card number while in transit to Stripe, so it’s important. If you don’t have an SSL, your payment page will have a big giant notice saying it’s not secure.
Stripe takes care of the PCI compliance for you. Credit card numbers are never stored in your website’s database, they are transferred to Stripe and processed, so even if your site’s database got hacked, that data would not be available to be stolen.
It’s not that hard and not that expensive to take credit cards on your website, and in 2018 and into the future, your customers want to pay their invoices online.

Amy Masson
Amy is the co-owner, developer, and website strategist for Sumy Designs. She's been making websites with WordPress since 2006 and is passionate about making sure websites are as functional as they are beautiful.