

Can I tell you a secret? There’s a wrong way and a right way to insert a photo into a post.
You may be doing it wrong!
I know what you may be thinking… I uploaded the photo, I hit insert, it shows up on the page. I’m done!
But not so fast….
There are a number of different options you can select when you insert a photo. Such as caption, alt text, title, description, alignment, link, and size. If you aren’t thinking about those, and addressing them each time, then you are doing it wrong!
So let’s go over the different options.
I’ve labeled my photo below to show you the options after you go to Add Media and upload your photo, but before you hit the “Insert into Post” button.
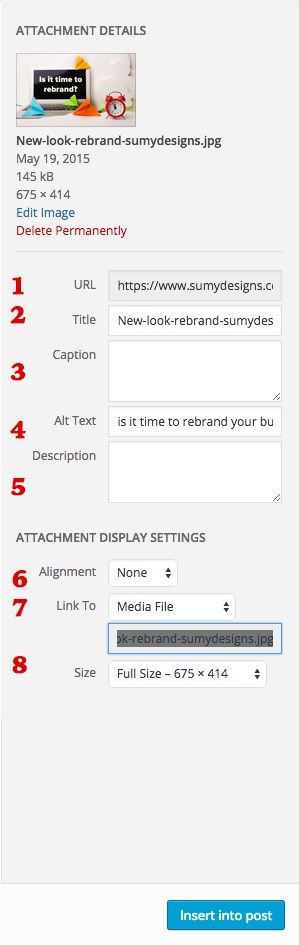
1. URL. This is the URL of your photo. It will be filled in automatically with the URL to your image. You won’t need to change this.
2. Title. This is often forgotten! If you don’t do anything, will default to the file name of your image. This might be okay, but consider this – any user who has a visual impairment and uses a screenreader will not see that image… instead, their reader will read the title of the image so they know what it is. If you don’t put a suitable title, then you are making your site incomprehensible to the visually impaired.
3. Caption. You might want to leave this blank. Or you might want a caption. Whatever you put in this box will show up in your post, below the photo.
4. Alt Text. Now, this is one you want to pay attention to, especially if SEO (Search Engine Optimization) is important to you. When you add an image, the search engines don’t see that image. They see the code that renders that image. Therefore, the alt text tells the search engines what that image is about. So if you are targeting a specific keyword phrase in your post, then you need to put that keyword phrase in that box!
5. Description. This is another item for accessibility for disabled viewers. You might include a longer description of your photo for those using screen readers.
6. Alignment. You have four choices: none, left, right, or center. If you chose left or right, then the image will align to that side of the page, and the text will wrap around it. If you choose none, it will just be on the left with no text wrap. And center will center it. (no text wrap)
7. Link to. This is my biggest pet peeve. Seriously. BIGGEST pet peeve. The Link To box allows you to choose what, if anything, your image should link to. By default, it usually just links to the image file. Which means if you do nothing and hit insert, then you are inserting an image into your post that links to… the image you just inserted into your post. Unless you want that image to show up in a lightbox (and you’ve set up the lightbox plugin), then this makes absolutely no sense. Why have your image open in a new page when clicked? You might have a reason. But you might not have ever thought about it. Change this option to NONE unless you really want that image to link somewhere.
8. Size. This is where you choose how big you want your image to be. By default, when you upload a photo, WordPress will upload it in four size: full size, large, medium, and thumbnail. (More if you set up custom image sizes.) So before you insert the image, you need to choose what size. DON’T just leave it on the default. Choose the appropriate size for your space. I realize you can grab the corner of the image and adjust the size, but if you insert a full size image and you only need a thumbnail. Using big images takes more bandwidth and slows your site, use the right size to keep things speedy.
Once you have addressed all the options for a photo, then it’s safe to hit Insert into post button!
Lastly, can I encourage you to please, please resize your photos before you upload them? When you take a photo with a camera, those photos are huge. They are really HUGE. This is what allows you to get great prints of them and blow them up. But on the web, they needn’t be that big. Shrink them down before you upload and save yourself some bandwidth.
Now go forth and insert photos…. properly.

Amy Masson
Amy is the co-owner, developer, and website strategist for Sumy Designs. She's been making websites with WordPress since 2006 and is passionate about making sure websites are as functional as they are beautiful.
What happened to the options to add borders and space around the pic? that seems to have gone away.
Those options are gone, aren’t they? I haven’t noticed them there in a while. I’m guessing because most themes come with those options built in so the photos look uniform.
If you want to add a border and/or spacing, here’s what you do. You switch to Text Editor and add a little CSS to your photo, like this:
