

I get a lot of emails about email. One of the most common issues people have is with email deliverability of their website form submissions. Why are they not coming through? Where are they going? Why are they being marked as spam? These are all good questions, and there are a lot of scenarios so I’m going to cover some of the most common email issues I see, and what the solution is.
Form submissions from your website are going to your spam folder
This is one of the most common problems I hear about, and there are many reasons why this might happen, and a number of possible solutions. A lot of times with these kinds of issues, you will have to go through a trial and error to figure out what might actually be the problem.
Mark the message as “Not Spam”
Sometimes the fix is as simple as just clicking the “Not Spam” or “Not Junk” button in your email folder. If you accidentally hit spam on one of the messages that came in, then your email program may have decided that all emails coming from your website are spam. Give that a try and submit a test to see if the email makes it into the inbox.
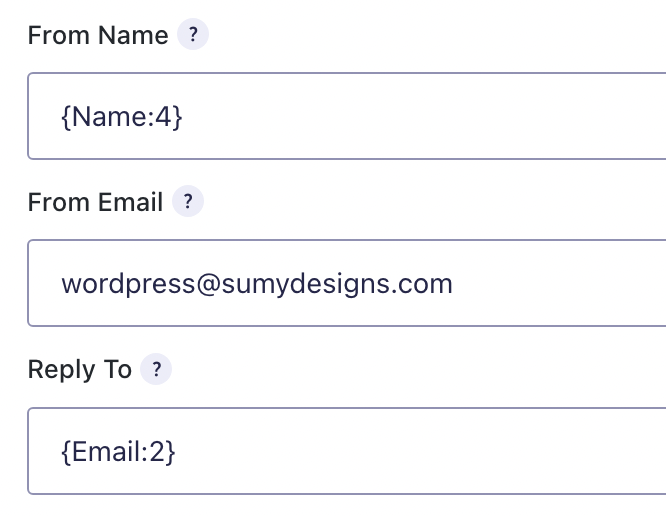
Check who the “from” email is set to on your form
It used to be pretty common practice that your “From” email address in a website form would be set to message sender. However, your email program is going to see that this email did not generate from that sender, but from your website, which has a different domain name. That’ll often times flag the email as spam, because they think it’s fishy that someone with a different email address was sending mail through a website. Instead of putting the sender’s email in the From field, set it to something that uses your domain, like no-reply@mydomain.com or wordpress@mydomain.com. Then, set the Reply-To field to the sender’s email address, so that when you reply to the message, it goes to the original sender and not the “from” field.
Check your website’s/email IP address reputation
If your website or your email has been flagged as spam, then your domain and IP could get put on a blacklist. This can cause a lot of issues with email deliverability. If your email program thinks your IP is a spammer, those messages are going to get caught. You can check if your domain is on a blacklist by using the blacklist tool at MX Toolbox. MX Toolbox is one of my favorite tools.
If your domain or IP are on a blacklist, then your next steps are to get them off. Usually if you show up on a blacklist, you can click through to that blacklist and potentially see why and find instructions on how to request removal. However, most of these are going to make you explain how you have rectified the situation that caused you to be on the blacklist. The most common problem I have seen is that an email address on the server was hacked and sending spam, causing that IP to get blacklisted. If that is the case, you’d have to solve the spam problem and then request to get off the list. If they think you are still spamming, they won’t take you off the list. Sometimes, it’s hard to get off those lists, but it’s important that you do.
And this is another reason why I recommend having a different email host than your website host. If you use email from Google or Microsoft, but you website is using a different server, then your email IP is different and won’t cause your website to get blacklisted. Usually.
Being blacklisted can also cause your spam filter in your website to stop sending you messages. Many years ago we discovered a lot of legitimate messages in the spam folder with the website, and that’s because the spam filter was associating the IP of the website it was on as a spammer. And in this case, it was shared hosting and it was another website on the same server that was causing the IP to be blacklisted. The fix in this case was moving the website to a new server to get a different IP. This is kind of an annoying fix, but it may be the only option if you can’t get off the blacklists.
Check that you have set up SPF, DKIM and DMARC records for your sending domain.
If you have MailChimp or Constant Contact, in the past week you’ve probably been prompted to make sure these are all correct. I’ve been doing a lot of DNS edits for clients to appease their CRM. And this is good, because we want those emails to be delivered and we want them to be legit.
What is SPF?
SPF stands for “Sender Policy Framework.” It’s an email authentication protocol designed to detect and prevent email spoofing. Email spoofing is when a malicious sender forges the email header information to make it appear as if the email is coming from a different sender’s domain.
SPF works by allowing domain owners to publish SPF records in their Domain Name System (DNS) settings. These SPF records specify which mail servers are authorized to send emails on behalf of the domain. When an email is received, the recipient’s mail server can check the SPF record of the sender’s domain to verify whether the email has originated from an authorized server. If the email comes from an authorized server listed in the SPF record, it passes the SPF check; otherwise, it may be treated as suspicious or potentially fraudulent.
What is DKIM?
DKIM stands for “DomainKeys Identified Mail.” It’s an email authentication method that helps verify the authenticity of email messages by adding a digital signature to the email headers. This signature is generated using cryptographic techniques.
What is DMARC?
DMARC stands for “Domain-based Message Authentication, Reporting, and Conformance.” It’s an email authentication protocol that builds upon SPF (Sender Policy Framework) and DKIM (DomainKeys Identified Mail) to help prevent email spoofing and phishing attacks.
DMARC works by allowing domain owners to publish policies in their DNS records that specify how their emails should be authenticated and handled if authentication fails.
SPF, DKIM, and DMARC are all records that you would manage within your DNS zone. If you aren’t familiar or comfortable making DNS edits, I’d ask for help from someone who is.
Set up a transactional e-mail service
If you try all the above issues, and still are struggling to get those messages, then I recommend setting up a transactional e-mail service like Mailgun or SendGrid. Some web hosting companies already have this built into their platform, so if you have a premium host, you may never experience this. And if you have signed up with us for support, we’re happy to set this up for you if needed at no additional charge.

Mailgun
My preferred sending service is Mailgun. Mailgun is an email delivery service that allows businesses to send, receive, and track emails programmatically through its APIs or web interface. It caters particularly to developers seeking an easy and reliable way to integrate email functionalities into their applications.
Here are some key points about Mailgun:
- Features: Sending transactional and marketing emails, email validation, tracking and analytics, and developer-friendly APIs.
- Pricing: Offers a free plan with limited features, followed by paid plans starting at $30 per month with varying sending limits and additional functionalities. You can find more details on their pricing page.
How to set up Mailgun in WordPress
- Create a Mailgun Account:
Sign up for a free trial or choose a paid plan that suits your needs on their website. - Verify your Domain:
Within your Mailgun account, follow the instructions to verify your domain ownership by adding specific TXT and MX records to your domain’s DNS settings. This helps ensure emails sent through Mailgun come from a legitimate source and improves deliverability. - Add Mailgun plugin and configure
Go to Plugins -> Add New and search for Mailgun in the plugin repository, install and activate the plugin. After installation, you’ll have to configure the plugin by going to Settings -> Mailgun and adding in the account details and API. Be sure to hit test to verify it’s working.
Once you set it up and get it activated, go to your website and submit a test form and see what happens. I find that 99% of the time, this solves the email problems.
Having a system like Mailgun installed also makes it easier to troubleshoot if something does go wrong later. I’ve had several instances when even with Mailgun installed, messages started getting blocked. But when you are using a system like Mailgun, you can login to the website and look at the sending logs and usually see exactly what the issue was. One time a client had accidentally marked their own form submission as spam, because a spammer sent a message through their form, and they inadvertently started blocking their own emails. Easy enough to fix once we could see why they were being blocked.
A few extra tips:
- Test your form every once in a while just to make sure you are getting those messages. You might not realize they aren’t coming in until you’ve missed a few. It’s good to once in a while confirm you have everything in working order.
- Check your spam folder a couple of times a week to make sure no form submissions are in there.
- Login to your site and look at the entries in your form plugin. I use Gravity Forms, and it shows all the form entries on the form so I can compare and see any that I may have missed. If you use Contact Form 7, you will have to add an extra plugin to see the submissions.

Amy Masson
Amy is the co-owner, developer, and website strategist for Sumy Designs. She's been making websites with WordPress since 2006 and is passionate about making sure websites are as functional as they are beautiful.